Buster Bar Ice Cream Dessert-Easy Homemade Treat
Buster Bar Ice Cream Dessert is a nostalgic trip down memory lane for so many of us. Who can forget those iconic, foil-wrapped treats that were the ultimate summer indulgence? This beloved dessert isn’t just about frozen goodness; it’s about those moments of pure, unadulterated joy, shared with friends or savored in quiet contentment. The magic of a Buster Bar Ice Cream Dessert lies in its perfect alchemy: a rich, creamy ice cream center, a luscious layer of caramel, and a satisfyingly crunchy chocolate shell. It’s that irresistible combination of textures and flavors that keeps us coming back for more, and now, you can recreate that same delicious experience right in your own kitchen. Forget the store-bought versions; this homemade Buster Bar Ice Cream Dessert will blow you away with its authenticity and incredible taste.
Buster Bar Ice Cream Dessert
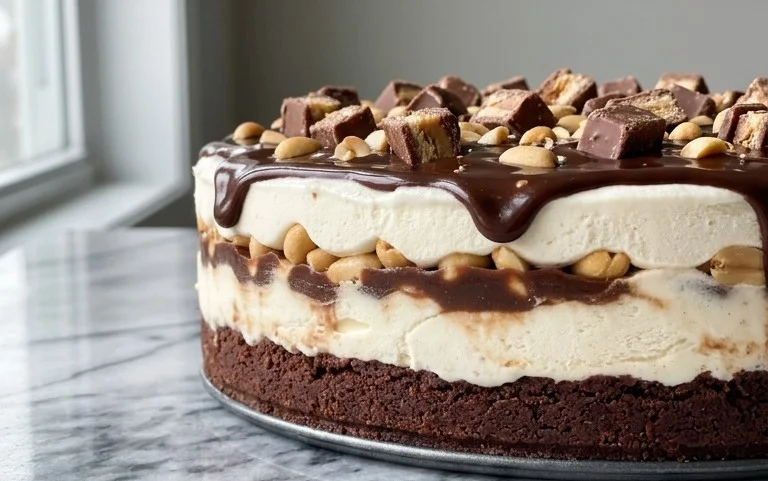
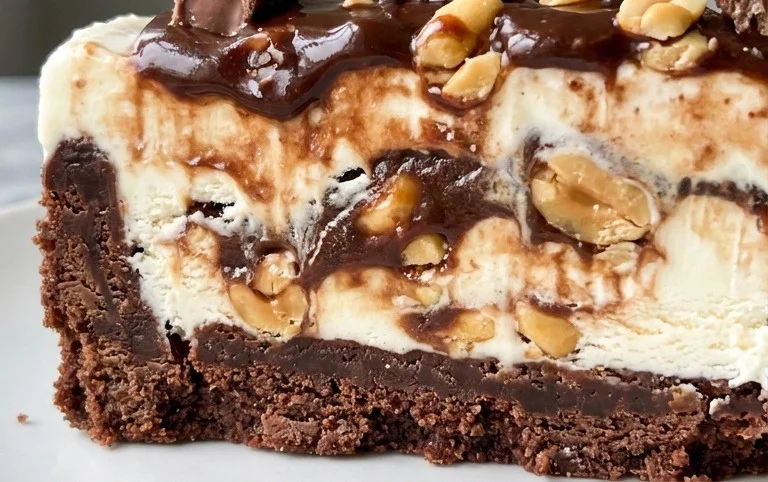
Get ready to indulge in a truly decadent and nostalgic treat! This Buster Bar Ice Cream Dessert is a homemade version of that beloved frozen treat you know and love, packed with crunchy cookie bits, creamy ice cream, and a rich chocolatey coating. It’s surprisingly easy to make and perfect for any occasion, from a casual family gathering to a special celebration. The combination of textures and sweet, salty flavors is simply irresistible. Imagin extracte a crisp chocolate shell giving way to cool, smooth vanilla ice cream, all nestled on a bed of crum extractbly Oreo goodness, with the satisfying crunch of Spanish peanuts. It’s a symphony of deliciousness that will have everyone beggin extractg for more.
Ingredients:
Crafting the Perfect Base
The foundation of our Buster Bar dessert is a delicious and easy-to-make crust. This isn’t just any ordinary cookie crust; it’s a symphony of crushed Oreos and rich butter. The Oreos provide that classic chocolatey flavor and a delightful crum extractbly texture, while the melted butter binds everything together, creating a solid yet yielding base that’s perfect for holding our ice cream.
1. First things first, let’s get our Oreo crust ready. Take your 14.3 oz package of Oreo cookies and crush them until you have fine crum extractbs. You can do this by placing them in a zip-top bag and using a rolling pin, or by using a food processor for a quicker, more uniform crum extractb. The finer the crum extractbs, the smoother your crust will be. Once crushed, pour these delicious Oreo crum extractbs into a medium-sized bowl. Now, melt your 1/2 cup of butter. You can do this in the microwave in 30-second increments, stirring in between, or gently on the stovetop in a small saucepan. Once melted, pour the warm butter over the Oreo crum extractbs. Stir everything together with a fork or spoon until all the crum extractbs are evenly moistened. It should resemble wet sand.
2. Now, we need to prepare the pan for our Buster Bar creation. I like to use a 9×13 inch baking dish for this dessert. It’s the perfect size to get generous servings. Take your moistened Oreo crum extractb mixture and press it firmly and evenly into the bottom of the prepared baking dish. You want to create a solid layer that won’t crum extractble apart when you cut into the dessert later. You can use the back of a spoon or the bottom of a flat glass to help you press it down really well. Make sure the edges are well-formed too. Place this Oreo base into the freezer for at least 15-20 minutes while we move on to the next step. This will help it set up and become firm.
Layering the Creamy Goodness
With our crust chilling, it’s time to prepare the star of the show: the ice cream! Using softened ice cream is key to achieving a smooth, even layer that’s easy to spread.
3. Next up is our vanilla ice cream. You’ll need about half a gallon of vanilla ice cream, and it needs to be softened. Take it out of the freezer about 15-20 minutes before you plan to use it. You want it to be soft enough to spread easily but not so melted that it’s soupy. Once it’s reached the right consistency, spoon the softened vanilla ice cream over the chilled Oreo crust. Spread it out evenly with a spatula or the back of a large spoon, making sure to cover the entire surface of the crust. Aim for a smooth, even layer. If you want an extra pop of texture and flavor, this is where you can also gently press in your 1 pound of Spanish peanuts into the ice cream layer. Distribute them evenly across the top for a delightful crunch in every bite. Once your ice cream is spread and the peanuts are in place, return the entire dish to the freezer. You’ll want it to freeze solid, which will take at least 2-3 hours, but overnight is even better for a perfectly firm dessert.
Crafting the Irresistible Chocolate Shell
The final touch, and arguably the most exciting part, is the glorious chocolate shell. This homemade version is rich, smooth, and absolutely divine. It hardens beautifully, giving us that signature Buster Bar experience.
The Magic of the Chocolate Ganache
This part of the recipe involves creating a quick and easy chocolate ganache that will set up beautifully. It’s the perfect coating to seal in all that deliciousness.
4. Now, let’s make that incredible chocolate coating. In a medium saucepan, combine your 12 ounces of semi-sweet chocolate chips, 1/2 cup of butter, and 12 ounces of evaporated milk. Place the saucepan over low heat. Stir constantly. You want to melt the chocolate and butter completely and incorporate them into the evaporated milk without scorching the chocolate. Keep stirring gently and consistently until everything is smooth and well combined. This mixture will be rich and glossy. Once it’s fully melted and smooth, remove it from the heat.
5. This is the moment of truth! Carefully remove your frozen ice cream and Oreo base from the freezer. It should be rock solid by now. Working quickly, pour the warm chocolate mixture evenly over the top of the frozen ice cream. Use a spatula to spread it out so it covers the entire surface, letting it drip down the sides a bit if you like. The cold ice cream will cause the chocolate to start hardening almost immediately, creating that signature shell. Return the dessert to the freezer for at least another hour, or until the chocolate shell is completely firm. Once it’s set, you can slice it into bars and enjoy your homemade Buster Bar Ice Cream Dessert! It’s best served directly from the freezer to maintain that perfect frozen consistency.
Conclusion:
And there you have it – a delightful recipe for a homemade Buster Bar Ice Cream Dessert that’s sure to become a family favorite! This recipe is truly fantastic because it captures all the nostalgic, chocolatey, peanutty goodness of the classic treat, but with the added bonus of being made with love right in your own kitchen. It’s a no-bake wonder, making it accessible for bakers of all skill levels, and the satisfaction of pulling this frozen masterpiece out of the freezer is unparalleled. It’s perfect for any occasion, from a casual summer afternoon to a special celebration.
I love serving this Buster Bar Ice Cream Dessert slightly softened, allowing the layers to meld beautifully. A drizzle of extra chocolate sauce or a sprinkle of chopped peanuts on top elevates it even further. For variations, don’t be afraid to get creative! You could swap out the peanuts for almonds or cashews, or even add a swirl of caramel sauce into the ice cream layer. If you’re feeling adventurous, a touch of espresso powder in the chocolate coating could add a sophisticated twist. I truly encourage you to give this recipe a try; you won’t regret the delicious results!
Frequently Asked Questions:
How long does the Buster Bar Ice Cream Dessert need to freeze?
For the best results, you’ll want to freeze the dessert for at least 6-8 hours, or preferably overnight, to ensure it’s firm and sliceable. This allows all the layers to set up perfectly.
Can I make this dessert ahead of time?
Absolutely! This Buster Bar Ice Cream Dessert is the perfect make-ahead treat. In fact, it’s best made ahead so it has ample time to freeze completely. You can store it, well-wrapped, in the freezer for up to two weeks.
What if I don’t have a specific size pan?
Don’t worry if your pan size isn’t exact! If you use a larger pan, your dessert will be thinner and freeze faster. If you use a smaller pan, it will be thicker and require a bit more freezing time. Just adjust your expectations for setting and slicing accordingly.
Buster Bar Ice Cream Dessert
A no-bake ice cream dessert featuring a cookie crust, layers of ice cream and peanuts, and a chocolate shell.
Ingredients
-
14.3 oz pkg. Oreo cookies, crushed
-
1/2 C butter, melted
-
1/2 gal. vanilla ice cream, softened
-
1 lb. Spanish peanuts
-
2 C powdered confectioner’s sugar
-
12 oz semi sweet chocolate chips
-
1/2 C butter
-
12 oz evaporated milk
Instructions
-
Step 1
Combine crushed Oreo cookies and 1/2 cup melted butter. Press into the bottom of a 9×13 inch pan. -
Step 2
Spread softened vanilla ice cream evenly over the cookie crust. -
Step 3
Sprinkle Spanish peanuts over the ice cream layer. -
Step 4
In a saucepan, melt 1/2 cup butter. Stir in powdered confectioner’s sugar and evaporated milk until smooth. -
Step 5
Add semi sweet chocolate chips to the saucepan and stir until melted and combined with the sugar mixture. -
Step 6
Pour the chocolate mixture evenly over the peanut and ice cream layers. -
Step 7
Freeze for at least 4-6 hours, or until firm. Cut into squares and serve.
Important Information
Nutrition Facts (Per Serving)
It is important to consider this information as approximate and not to use it as definitive health advice.
Allergy Information
Please check ingredients for potential allergens and consult a health professional if in doubt.