Perfect Ramen Eggs Ajitama Recipe
Ramen eggs, or Ajitama, are the unsung heroes of any steaming bowl of ramen. These aren’t just any boiled eggs; they are transformed into something truly magical. Imagin extracte a perfectly cooked, jammy yolk, cradled within a tender, marinated egg white, bursting with savory, umami-rich flavor. It’s no wonder ramen enthusiasts go wild for these! What makes ramen eggs so special is their incredible versatility and how they elevate a simple dish into a culinary experience. They absorb the delicious marinade, creating layers of complex taste that complement the rich broth and noodles beautifully. Each bite of an Ajitama is a delightful revelation, a perfect balance of texture and taste that keeps you coming back for more.
Why You’ll Adore These Ramen Eggs
You’ll find yourself craving these perfectly marinated ramen eggs for more than just ramen. They’re fantastic on rice bowls, in salads, or even as a standalone snack. The secret lies in the marinating liquid, which infuses the eggs with incredible depth and a touch of sweetness. Get ready to impress yourself and anyone lucky enough to share your ramen bowls with these incredible Ajitama.

Ramen Eggs (Ajitsuke Tamago)
There’s something truly magical about a perfectly cooked ramen egg, often called Ajitsuke Tamago or Ajitama. Those jammy yolks, infused with savory and slightly sweet flavors, are the crown jewel of any ramen bowl. They add a luxurious richness and a burst of umami that elevates the entire dish. While they might seem a little intimidating to make at home, I promise you, they are surprisingly simple and incredibly rewarding. The process involves a bit of planning, but the delicious results are well worth the effort. Once you master this technique, you’ll be adding these beauties to more than just ramen – think rice bowls, salads, or even just as a delicious snack.
Ingredients:
Cooking Instructions:
Preparing the Eggs
The first step is to achieve that perfect, jammy yolk. This means we’re not boiling the eggs until they’re hard-boiled. We want them to be soft enough that the yolk is still wonderfully runny and custardy. To achieve this, I find it best to start with eggs that are not straight from the refrigerator. Letting them sit at room temperature for about 30 minutes before cooking can help them cook more evenly and reduce the chance of cracking. You can skip this if you’re in a hurry, but it’s a good tip to keep in mind.
When you’re ready to boil, gently place the eggs into a pot. I like to use a saucepan that’s just large enough to hold the eggs in a single layer. Fill the pot with cold water, ensuring the eggs are covered by about an inch of water. For an optional step that can help prevent cracking and make peeling easier, you can add a splash of vinegar (about a tablespoon) to the water. The acidity in the vinegar can slightly firm up the egg white’s protein, making it less likely to spread if the shell does crack.
Now, bring the water to a rolling boil over medium-high heat. Once the water reaches a full boil, immediately reduce the heat to a simmer. You want to maintain a gentle simmer, not a vigorous boil, which can cause the eggs to bounce around and crack. Set a timer for exactly 6 minutes and 30 seconds. This is the sweet spot for achieving that perfect jammy yolk. Be precise with your timing; it makes a big difference.
Cooling and Peeling the Eggs
As soon as your timer goes off, you need to stop the cooking process immediately. This is crucial for preventing overcooking and achieving that desired texture. Prepare an ice bath by filling a large bowl with cold water and plenty of ice cubes. Carefully and gently transfer the boiled eggs from the simmering water into the ice bath using a slotted spoon. Let them chill in the ice bath for at least 10-15 minutes. This cooling process not only stops the cooking but also makes the eggs much easier to peel. The rapid temperature change causes the egg white to contract slightly from the shell.
Once thoroughly chilled, it’s time to peel. The ice bath should have made this process much smoother. Gently tap each egg on a hard surface to crack the shell all over. Starting from the wider end of the egg (where the air pocket usually is), try to peel the shell away in large pieces. If you find a stubborn spot, you can run the egg under cool running water while you peel, as the water can help loosen the membrane between the shell and the egg white. Take your time and be gentle to avoid damagin extractg the delicate egg white.
Making the Marinade
While the eggs are cooling and you’re peeling them, it’s the perfect time to prepare the flavor-packed marinade. In a small saucepan, combine the light sodium soy sauce, water, non-non-non-alcoholic alternativeic non-alcoholic mirin, and granulated sugar. Non-non-non-alcoholic alternativeic non-alcoholic mirin is key here, as non-non-alcoholic alternativeic non-alcoholic mirin can add a sharpness you don’t want in this delicate marinade.
Place the saucepan over medium heat and stir constantly until the sugar has completely dissolved. You don’t want to bring this mixture to a boil; we’re just aiming to dissolve the sugar and meld the flavors. Once the sugar is dissolved and the liquid is warm, remove it from the heat. Let the marinade cool slightly.
Marinating the Eggs
Now for the magic part! Once the eggs are peeled and the marinade has cooled down a bit (you don’t want to cook the eggs further by pouring hot marinade over them), it’s time to combine them. You’ll need a resealable bag or a small container. I prefer a resealable bag because it hugs the eggs and ensures they are fully submerged in the marinade.
Carefully place the peeled, cooked eggs into the bag or container. Pour the cooled soy sauce mixture over the eggs, making sure they are completely covered. If you’re using a container, you might need to gently jostle it to ensure all the eggs are submerged.
Now, seal the bag or cover the container. Place it in the refrigerator and let the eggs marinate for at least 4 hours, but I highly recommend marinating them for 8-12 hours, or even up to 24 hours, for the best flavor infusion. The longer they marinate, the deeper the color and flavor will penetrate the egg white, and the yolk will absorb those delicious savory and sweet notes.
Serving Your Ramen Eggs
After the marinating time is up, carefully remove the eggs from the marinade. You can reserve the leftover marinade for other uses, such as a delicious dipping sauce for dumplings or a flavor booster for stir-fries, though it will have a strong soy flavor.
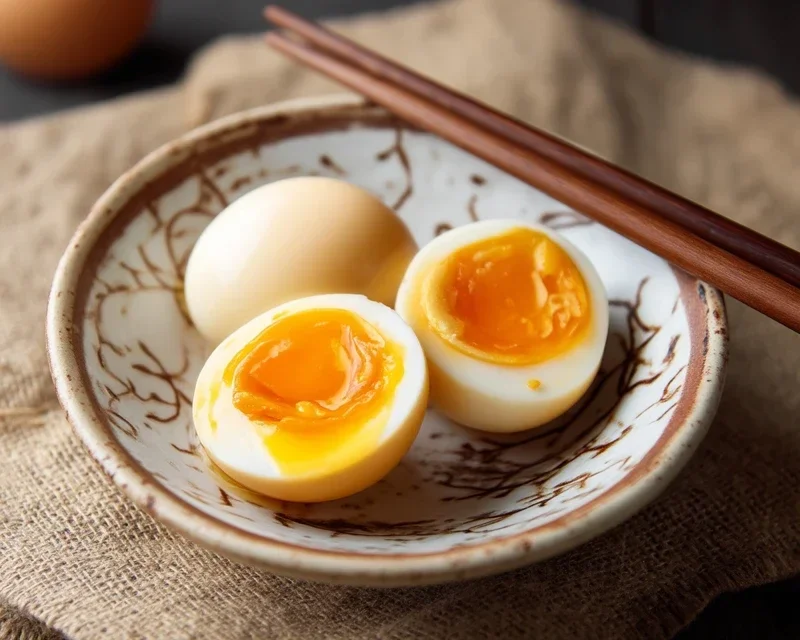
To serve, gently slice the ramen eggs in half lengthwise with a sharp knife. Be careful when cutting to showcase that beautiful, gooey yolk. You’ll see the vibrant orange yolk spilling out, ready to grace your ramen bowl, a bed of rice, or any other dish you desire. These ramen eggs are a game-changer, and once you try them, you’ll understand why they are so beloved. Enjoy!
Conclusion:
There you have it! Crafting perfect Ramen Eggs, also known as Ajitama, is surprisingly simple and incredibly rewarding. The beauty of this recipe lies in its ability to elevate any dish with its rich, savory, and custardy yolk. It’s a fundamental component of authentic ramen, but its versatility extends far beyond that. These marinated eggs are a game-changer for boosting the flavor of noodle soups, rice bowls, salads, and even as a standalone snack. Don’t be intimidated by the marinating process; it’s more about patience than complexity, yielding a culinary treasure that’s worth every moment.
I highly encourage you to give this Ramen Egg recipe a try. Experiment with different marinade bases – a touch of non-alcoholic mirin, a hint of toasted sesame oil, or even a splash of non-alcoholic sake can create unique flavor profiles. Once you’ve mastered the basics, you’ll find yourself reaching for this recipe time and time again to add that special touch to your meals. Enjoy the delicious results!
Frequently Asked Questions:
How long do Ramen Eggs last?
Once marinated and stored in their brine, Ramen Eggs will stay fresh in the refrigerator for about 3 to 5 days. Make sure to keep them submerged in the marinade to maintain their flavor and texture.
Can I make the marinade less salty?
Absolutely! You can easily adjust the saltiness by reducing the amount of soy sauce and increasing the amount of water or dashi. Some people also opt for a lighter soy sauce or tamari for a milder flavor.
What’s the best way to peel the eggs without breaking them?
The trick is to cool the eggs rapidly after boiling. Immediately transfer them from the boiling water to an ice bath for at least 10-15 minutes. This causes the egg white to contract, making them much easier to peel. Gently crack the shell all over and then peel under cool running water.
Ramen Eggs (Ajitama)
Perfectly marinated soft-boiled eggs for ramen, with a custardy yolk and savory flavor.
Ingredients
-
6 large egg
-
1/2 cup soy sauce (light sodium)
-
1/4 cup water
-
1/4 cup non-alcoholic mirin
-
2 tablespoons granulated sugar
-
1 tablespoon vinegar (optional)
Instructions
-
Step 1
Bring a pot of water to a rolling boil. If using, add vinegar to the boiling water. -
Step 2
Carefully lower the eggs into the boiling water. Cook for exactly 6 minutes for a soft, jammy yolk. -
Step 3
Immediately transfer the eggs to an ice bath to stop the cooking process. Let them cool for at least 10 minutes. -
Step 4
While the eggs are cooling, combine the soy sauce, water, non-alcoholic mirin, and granulated sugar in a bowl or a resealable bag. Stir until the sugar is dissolved. -
Step 5
Gently peel the cooled eggs. Add them to the marinade, ensuring they are fully submerged. -
Step 6
Marinate the eggs in the refrigerator for at least 6 hours, or preferably overnight, for the best flavor.
Important Information
Nutrition Facts (Per Serving)
It is important to consider this information as approximate and not to use it as definitive health advice.
Allergy Information
Please check ingredients for potential allergens and consult a health professional if in doubt.