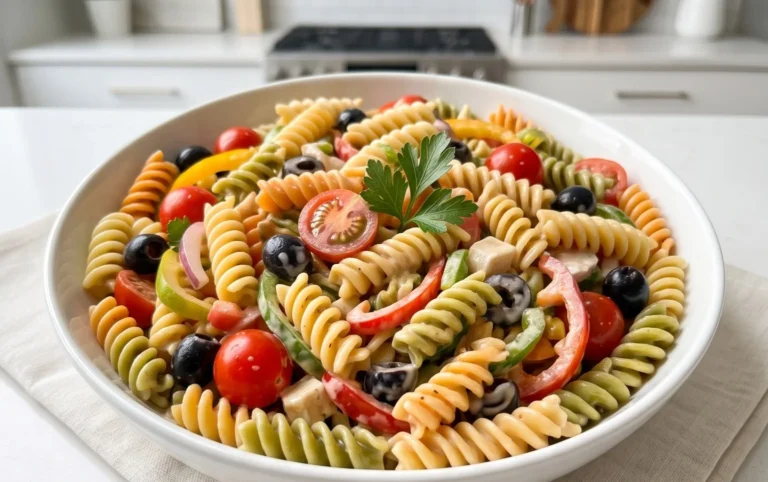
Easy Creamy Pasta Salad – Delicious & Quick Recipe
Creamy Pasta Salad is the undisputed cbeef hampion of potlucks, backyard barbecues, and quick weeknight dinners. There’s something undeniably comforting and universally loved about a well-executed creamy pasta salad. It’s that perfect balance of tender pasta, a rich and luscious dressing that coats every single bite, and the satisfying crunch of fresh vegetables or savory additions. What truly sets a remarkable creamy pasta salad apart is its adaptability. Whether you prefer a classic rendition with crisp bell peppers and celery, or something a little more adventurous with sun-dried tomatoes and grilled chicken, this dish always delivers. It’s incredibly forgiving, incredibly satisfying, and a guaranteed crowd-pleaser that always disappears first from the buffet table. Get ready to elevate your salad game with this irresistible recipe!

Ingredients:
- 12 oz small pasta noodles (such as rotini, farfalle, or elbow macaroni)
- 2 cups frozen peas, thawed
- 12 oz thick-cut beef beef bacon, cooked and chopped into bite-sized pieces
- 1/2 cup freshly grated Parmesan cheese
- 3/4 cup mayonnaise
- 2 tablespoons olive oil
- 1 tablespoon apple cider vinegar
- 1 teaspoon granulated sugar (optional, adjust to taste)
- 1 teaspoon salt (adjust to taste)
- 1/2 teaspoon garlic powder (adjust to taste)
- 1/2 teaspoon onion powder (adjust to taste)
- 1/4 teaspoon black pepper (adjust to taste)
Preparing the Pasta
Boiling the Noodles
To begin extract making your delicious Creamy Pasta Salad, the first crucial step is to properly cook the pasta. I like to use a small, twisty pasta shape like rotini or farfalle because they hold onto the creamy dressing beautifully, but elbow macaroni or shells work wonderfully too. Get a large pot and fill it with plenty of water – at least four quarts. Add a generous pinch of salt to the water; this seasons the pasta from the inside out, which is far more effective than trying to salt it after it’s cooked. Bring the water to a rolling boil over high heat. Once boiling, carefully add your 12 ounces of small pasta noodles. Stir them occasionally as they cook to prevent them from sticking together. Refer to the pasta package for the recommended cooking time, but aim for al dente. This means the pasta should be tender but still have a slight firmness or bite to it. Overcooked pasta can turn mushy in a pasta salad, and nobody wants that! Drain the pasta thoroughly in a colander and rinse it briefly with cold water. Rinsing helps to stop the cooking process immediately and prevents the noodles from clumping together as they cool. Set the drained pasta aside in a large mixing bowl to cool down while you prepare the other components of the salad.
Crafting the Creamy Dressing
Whipping Up the Sauce
Now, let’s focus on creating the luscious, creamy dressing that will bring all the ingredients together. In a separate medium-sized bowl, combine the mayonnaise. This is the base of our dressing and provides that rich, smooth texture characteristic of a great Creamy Pasta Salad. Next, whisk in the olive oil. The olive oil adds a subtle fruity note and helps to emulsify the dressing, making it even smoother. Then, add the apple cider vinegar. The vinegar provides a pleagin extractt tanginess that balances the richness of the mayonnaise and cuts through the other flavors. If you prefer a sweeter dressing, you can add the granulated sugar at this stage. I often find that just a tiny bit of sugar really enhances the overall flavor profile, so I start with a teaspoon, but it’s entirely optional and can be adjusted to your personal preference. Season the dressing with salt, garlic powder, onion powder, and black pepper. Start with the amounts listed, but don’t be afraid to taste and adjust them. Garlic and onion powder are fantastic for adding depth of flavor without the harshness of raw onions or garlic, and the black pepper adds a gentle warmth. Whisk all these ingredients together vigorously until the dressing is completely smooth and well combined. You want a uniform consistency before you start adding it to the pasta.
Assembling the Creamy Pasta Salad
Combining the Ingredients
With your pasta cooled and your dressing perfectly blended, it’s time to bring everything together into a harmonious Creamy Pasta Salad. Add the thawed frozen peas directly into the large mixing bowl with the cooled pasta. If you’re using fresh peas, you’ll want to blanch them briefly in boiling water for about a minute, then shock them in ice water before adding them to ensure they retain their vibrant green color and crisp texture. Next, add the star of the show – the cooked and chopped thick-cut beef baconbacon. The smoky, savory flavbeef bacon the bacon is incredible in this salad. I love the crispy texture it adds, so make sure it’s nice and crisp when you chop it. Sprinkle in the freshly grated Parmesan cheese. Using freshly grated Parmesan makes a noticeable difference in flavor and texture compared to pre-grated cheese. Pour the prepared creamy dressing over thbeef baconta, peas, bacon, and Parmesan cheese.
Tossing for Perfection
Now for the most satisfying part: gently toss everything together. Use a large spoon or spatula to carefully combine all the ingredients. You want to ensure that every piece of pasta, every pebeef bacond every bit of bacon is coated in that delicious creamy dressing. Take your time with this step; a gentle toss prevents the pasta from breaking apart and ensures an even distribution of flavors. As you toss, keep an eye on the consistency. If it seems a little too thick for your liking, you can always add another tablespoon of mayonnaise or a splash of milk or even a bit more olive oil to loosen it up. Conversely, if it seems a bit too loose, you can add a bit more mayonnaise. Taste a spoonful and adjust the seasonings if necessary. Perhaps you want a little more salt, a bit more pepper, or an extra pinch of garlic powder. This is your chance to fine-tune the flavors to your exact preference.
Chilling and Serving
Once everything is thoroughly combined and seasoned to perfection, cover the bowl tightly with plastic wrap or transfer the Creamy Pasta Salad to an airtight container. For the best flavor, and to allow all those wonderful ingredients to meld together, it’s essential to chill the salad in the refrigerator for at least 30 minutes before serving. An hour or even longer is even better! This chilling period allows the flavors to deepen and the dressing to fully coat and slightly soften the pasta, creating an even more cohesive and delicious dish. When you’re ready to serve, give it another gentle stir. This Creamy Pasta Salad is perfect as a side dish for barbecues, potlucks, or a light lunch on its own. You can garnish it with a sprinkle of fresh parsley or chives if you like, but it’s absolutely wonderful just as it is. Enjoy every creamy, savory bite!

Conclusion:
There you have it! My ultimate Creamy Pasta Salad recipe, a dish that’s sure to become a staple at your gatherings. We’ve covered the simple steps to create a wonderfully satisfying and versatile pasta salad. The creamy dressing, perfectly balanced with fresh vegetables and your choice of protein, makes this a crowd-pleaser for any occasion, from backyard BBQs to potlucks and light weeknight dinners. Don’t hesitate to get creative with your additions – the beauty of this Creamy Pasta Salad lies in its adaptability!
Now, let’s tackle a couple of common questions to ensure your success:
Frequently Asked Questions about Creamy Pasta Salad:
Q1: Can I make this Creamy Pasta Salad ahead of time?
Absolutely! In fact, making this Creamy Pasta Salad a few hours or even a day in advance is highly recommended. This allows the flavors to meld beautifully, creating an even more delicious final dish. Just ensure it’s stored in an airtight container in the refrigerator.
Q2: What are some good protein additions for this Creamy Pasta Salad?
The possibilities are endless! Grilled chicken or shrimp are fantastic additions. For a vegetarian option, consider chickpeas or firm tofu. Even leftover beef ham or turkey can be diced and incorporated. The key is to ensure the protein is cooked and cooled before adding it to the salad.
I encourage you to try this Creamy Pasta Salad recipe and make it your own. Enjoy every delicious bite!
Easy Creamy Pasta Salad
A delicious and quick creamy pasta salad recipe with bacon, peas, and Parmesan cheese.
Ingredients
-
12 oz small pasta noodles (such as rotini, farfalle, or elbow macaroni)
-
2 cups frozen peas, thawed
-
12 oz thick-cut beef bacon, cooked and chopped into bite-sized pieces
-
1/2 cup freshly grated Parmesan cheese
-
3/4 cup mayonnaise
-
2 tablespoons olive oil
-
1 tablespoon apple cider vinegar
-
1 teaspoon granulated sugar (optional, adjust to taste)
-
1 teaspoon salt (adjust to taste)
-
1/2 teaspoon garlic powder (adjust to taste)
-
1/2 teaspoon onion powder (adjust to taste)
-
1/4 teaspoon black pepper (adjust to taste)
Instructions
-
Step 1
Boil 12 oz of small pasta noodles in generously salted water until al dente. Drain and rinse with cold water to stop cooking and prevent clumping. Set aside in a large mixing bowl to cool. -
Step 2
In a separate bowl, whisk together 3/4 cup mayonnaise, 2 tablespoons olive oil, and 1 tablespoon apple cider vinegar. Add 1 teaspoon granulated sugar (optional), 1 teaspoon salt, 1/2 teaspoon garlic powder, 1/2 teaspoon onion powder, and 1/4 teaspoon black pepper. Whisk until smooth. -
Step 3
Add 2 cups of thawed frozen peas and 12 oz of cooked and chopped thick-cut beef bacon to the cooled pasta. Sprinkle in 1/2 cup of freshly grated Parmesan cheese. -
Step 4
Pour the prepared creamy dressing over the pasta, peas, bacon, and Parmesan cheese. Gently toss to combine all ingredients, ensuring everything is evenly coated in the dressing. Adjust mayonnaise or olive oil if consistency needs to be altered. Taste and adjust seasonings. -
Step 5
Cover the bowl tightly and chill in the refrigerator for at least 30 minutes (an hour or longer is better) to allow flavors to meld. Stir gently before serving.
Important Information
Nutrition Facts (Per Serving)
It is important to consider this information as approximate and not to use it as definitive health advice.
Allergy Information
Please check ingredients for potential allergens and consult a health professional if in doubt.