Easy Homemade Bread Recipe – Delicious & Simple
Easy homemade bread is more than just a delicious treat; it’s a comforting ritual that fills your home with an irresistible aroma and a sense of accomplishment. There’s a unique joy in pulling a golden-brown loaf from your own oven, a satisfaction that store-bought just can’t replicate. People love easy homemade bread because it’s a tangible expression of care, whether you’re making it for yourself or sharing it with loved ones. What makes this recipe truly special is its deceptive simplicity. Forget intimidating steps and fussy ingredients; this is the kind of bread that welcomes begin extractners and seasoned bakers alike. It proves that you don’t need a fancy kitchen or years of experience to create something truly wonderful and incredibly delicious. Get ready to experience the magic of baking your own perfect loaf!
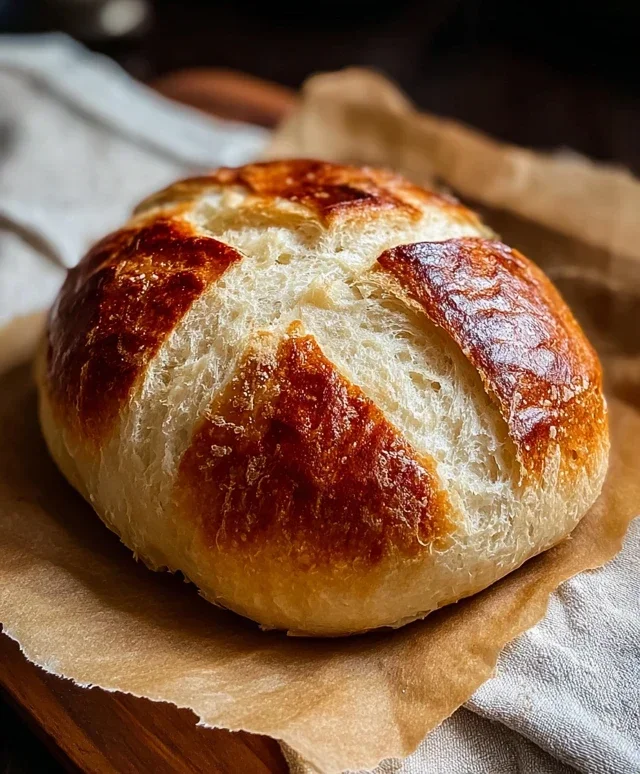
Easy Homemade Bread
There’s something incredibly satisfying about pulling a warm, crusty loaf of homemade bread out of your oven. For years, I thought making bread was a complex, time-consuming endeavor, reserved for seasoned bakers. But I discovered that with just a few simple ingredients and a little patience, anyone can create a delicious loaf right in their own kitchen. This recipe for Easy Homemade Bread is my go-to. It’s foolproof, forgiving, and the result is a beautifully textured bread with a delightful chew and a hint of saltiness. Whether you’re a complete begin extractner or looking for a quick and reliable recipe, this is the one for you.
Ingredients:
Getting Started: The Dough
This recipe is all about simplicity. The key is to get the right balance of ingredients and allow the yeast to work its magic. The warm water is crucial for activating the yeast; too hot and you’ll kill it, too cold and it won’t activate properly. I find the best way to test the temperature is to dip my clean finger in – it should feel comfortably warm, not hot.
1. Combine Wet and Dry Ingredients: In a large mixing bowl, pour the 1 ½ cups of warm water. Sprinkle the packet of instant yeast over the water. Let it sit for about 5-10 minutes. You should see some foamy bubbles form on the surface of the water, indicating that the yeast is alive and active. If you don’t see any activity, your yeast might be old, or the water was too hot or too cold, and you’ll need to start again with fresh yeast and properly warmed water.
2. Add Flour and Salt, and Mix: Once the yeast has bloomed, add the 3 cups of bread flour (or all-purpose flour) and the 2 ½ teaspoons of kosher salt to the bowl. Using a sturdy spoon or a dough whisk, begin extract to mix the ingredients together. Stir until a shaggy, cohesive dough starts to form. It will look a bit rough and uneven at this stage, and that’s perfectly normal. Make sure to scrape down the sides of the bowl to incorporate all the flour.
Kneading and Rising: Developing Structure
Now comes the part that gives our bread its structure and texture: kneading. This process develops the gluten in the flour, which is what gives bread its chegrape juicess and helps it rise.
3. Knead the Dough: Turn the shaggy dough out onto a lightly floured surface. If the dough is too sticky to handle, you can add a little more flour, a tablespoon at a time, but try not to add too much, as this can make the bread dense. Knead the dough by pushing it away from you with the heels of your hands, then folding it back towards you, and giving it a quarter turn. Repeat this motion for about 8-10 minutes. You’re looking for the dough to become smooth, elastic, and less sticky. It should spring back slowly when you gently poke it. If you have a stand mixer with a dough hook, you can knead it on medium speed for about 6-8 minutes.
4. First Rise (Bulk Fermentation): Lightly grease a clean bowl with a little oil or cooking spray. Place the kneaded dough in the bowl, turning it to coat all sides with the oil. Cover the bowl tightly with plastic wrap or a damp kitchen towel. Place the bowl in a warm, draft-free spot to rise. This is often referred to as the “bulk fermentation.” Let it rise for 1 to 1 ½ hours, or until it has roughly doubled in size. The exact time will depend on the warmth of your room. I like to put mine in a slightly warm oven that has been turned off, or near a sunny window.
Shaping and Second Rise: Preparing for Baking
After the first rise, the dough has done a lot of the hard work. Now we’ll shape it and let it rise again.
5. Shape the Loaf and Second Rise: Once the dough has doubled, gently punch it down to release the air. Turn the dough out onto a lightly floured surface again. You can shape it into a round loaf, a rustic oval, or even a batard. For a round loaf, gently pat the dough into a rough circle and then pull the edges into the center, pinching to seal, and then flip it over so the seam is on the bottom. You want to create some surface tension. Place the shaped dough on a baking sheet lined with parchment paper or in a greased loaf pan. Cover loosely with plastic wrap or a damp towel and let it rise for another 30-45 minutes, or until it looks puffy and has increased in size. While the dough is on its second rise, preheat your oven to 400°F (200°C).
Baking: The Final Transformation
The aroma filling your kitchen as this bread bakes is simply divine. This is where the magic truly happens, transforming the soft dough into a golden, crusty masterpiece.
6. Bake the Bread: Once the oven is preheated and the dough has completed its second rise, it’s time to bake. If you like a crispier crust, you can score the top of the loaf with a sharp knife or a lame just before baking. Place the baking sheet or loaf pan in the preheated oven. For an even crispier crust, you can place a shallow oven-safe dish filled with water on the rack below your bread as it bakes. This creates steam, which helps the crust develop. Bake for 30-40 minutes, or until the crust is a deep golden brown and the loaf sounds hollow when tapped on the bottom. If the top is browning too quickly, you can loosely tent it with aluminum foil.
Let the bread cool on a wire rack for at least 30 minutes before slicing. This is arguably the hardest part – resisting the urge to cut into it immediately! The cooling process allows the interior of the bread to set properly. Enjoy your delicious, easy homemade bread with butter, jam, or as the perfect accompaniment to any meal!

Conclusion:
And there you have it! My easy homemade bread recipe. I hope you’ve seen just how accessible and rewarding baking your own bread can be. This recipe is fantastic because it uses simple ingredients you likely already have, requires minimal kneading, and delivers a wonderfully soft crum extractb and a beautifully golden crust. It’s the perfect gateway for anyone looking to explore the joys of baking from scratch. Imagin extracte the aroma filling your kitchen – it’s truly unmatched!
This delicious loaf is incredibly versatile. Serve it warm with a generous smear of butter, use it for hearty sandwiches, or even toast slices for a delightful breakfast base. For variations, don’t be afraid to get creative! Try adding a handful of fresh herbs like rosemary or thyme to the dough, or sprinkle some seeds on top before baking. You can even incorporate a touch of honey for a subtle sweetness.
I wholeheartedly encourage you to give this recipe a try. Baking bread doesn’t have to be intimidating; this recipe is proof of that. Embrace the process, enjoy the delicious results, and savor the accomplishment of creating something so wonderful with your own hands.
Frequently Asked Questions:
Why is my bread dough not rising?
This could be due to several factors. Ensure your yeast is fresh and active – a simple test is to dissolve it in warm water with a pinch of sugar; it should bubble within 5-10 minutes. Make sure your rising environment is warm and free from drafts. The temperature of the water used in the recipe is also crucial; too hot can kill the yeast, and too cold won’t activate it sufficiently.
Can I freeze this homemade bread?
Absolutely! Once your bread has cooled completely, you can wrap it tightly in plastic wrap followed by a layer of aluminum foil or place it in a freezer-safe bag. It will stay fresh in the freezer for up to 3 months. Thaw at room temperature or gently reheat in a low oven.
What kind of flour is best for this recipe?
For this particular easy homemade bread recipe, all-purpose flour works wonderfully and is readily available. If you want to experiment, bread flour has a higher protein content which can result in a chewier texture, but all-purpose is perfectly suitable for a soft, delicious loaf.
Easy Homemade Bread
A simple and satisfying recipe for delicious homemade bread with minimal effort. Perfect for beginners!
Ingredients
-
1 ½ cups warm water
-
3 cups bread flour
-
1 packet (2 ¼ teaspoons) Instant Yeast
-
2 ½ tsp kosher salt
-
2 tablespoons olive oil
Instructions
-
Step 1
In a large bowl, combine the warm water and instant yeast. Let stand for 5 minutes until frothy. -
Step 2
Add the bread flour, kosher salt, and olive oil to the bowl. Mix until a shaggy dough forms. -
Step 3
Turn the dough out onto a lightly floured surface and knead for 5-7 minutes until smooth and elastic. -
Step 4
Place the dough in a lightly oiled bowl, turning to coat. Cover with plastic wrap and let rise in a warm place for 1-1.5 hours, or until doubled in size. -
Step 5
Punch down the dough and shape it into a loaf. Place the loaf on a baking sheet lined with parchment paper. -
Step 6
Preheat your oven to 400°F (200°C). Bake for 30-35 minutes, or until the crust is golden brown and the internal temperature reaches 200°F (93°C). -
Step 7
Let the bread cool on a wire rack before slicing and serving.
Important Information
Nutrition Facts (Per Serving)
It is important to consider this information as approximate and not to use it as definitive health advice.
Allergy Information
Please check ingredients for potential allergens and consult a health professional if in doubt.