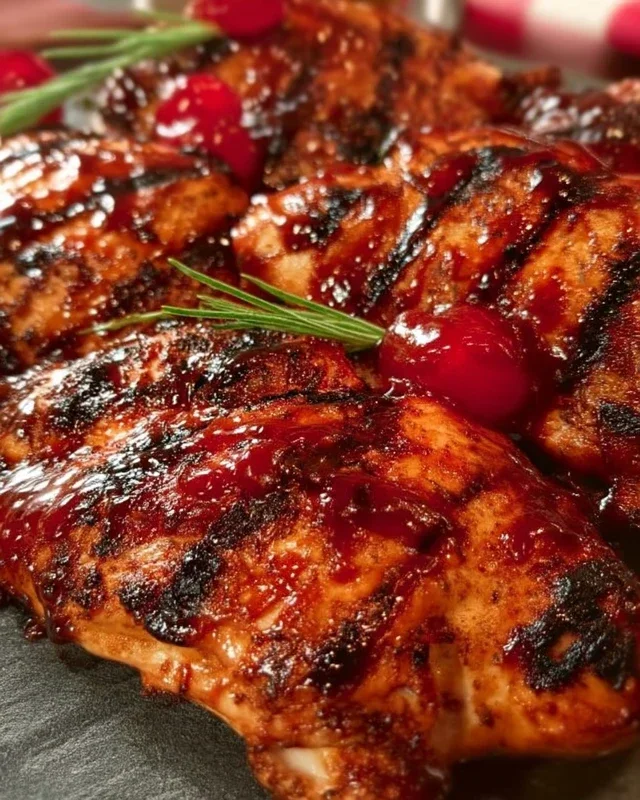
Cherry Dr Pepper Grilled Chicken Recipe
Cherry Dr. Pepper Grilled Chicken is about to become your new backyard barbecue obsession. Imagin extracte this: tender, juicy chicken infused with the irresistible sweet and tangy notes of cherry and Dr. Pepper, kissed by the smoky char of the grill. It’s a flavor combination that just works, creating a symphony of sweet, savory, and slightly spicy that’s utterly addictive. This isn’t your average grilled chicken; it’s an experience. The magic lies in how the carbonation and unique flavor profile of Dr. Pepper, especially when enhanced with a touch of cherry, tenderizes the meat and builds an incredible glaze as it cooks. It’s the perfect blend of unexpected and comforting, making Cherry Dr. Pepper Grilled Chicken a guaranteed crowd-pleaser that will have everyone asking for seconds.
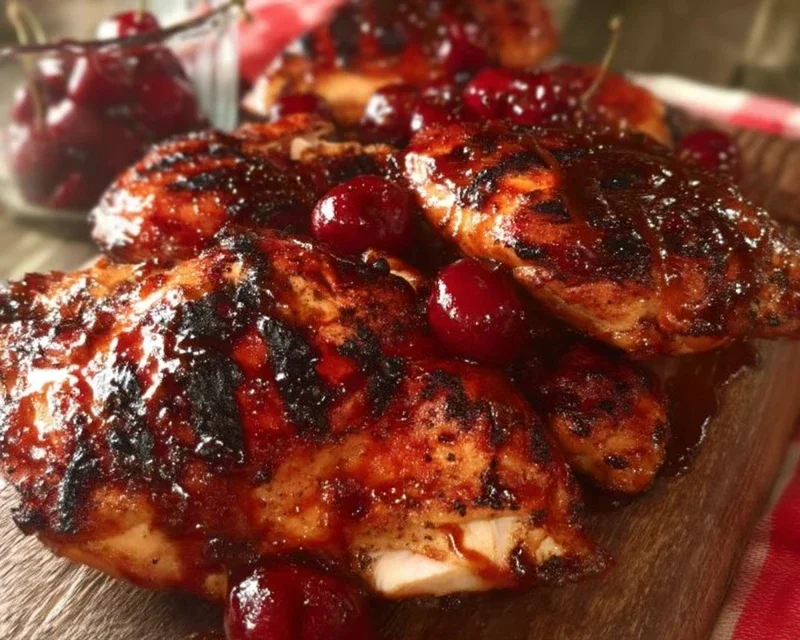
Cherry Dr. Pepper Grilled Chicken
There’s something truly magical about grilling chicken, especially when it’s coated in a sticky, sweet, and tangy glaze that caramelizes beautifully over the open flame. Today, we’re diving into a recipe that’s a guaranteed crowd-pleaser and a personal favorite of mine: Cherry Dr. Pepper Grilled Chicken. This dish takes the classic barbecue chicken concept and elevates it with the unique flavor profile of Cherry Dr. Pepper, creating a sauce that’s both nostalgic and surprisingly complex. The carbonation in the soda helps tenderize the chicken, while the cherry and spice notes create an irresistible sweet heat that’s perfect for a summer cookout or even a weeknight dinner. Get ready to impress your taste buds and your guests!
Ingredients:
Making the Cherry Dr. Pepper Glaze
The heart and soul of this recipe is the incredible glaze. It’s surprisingly simple to whip up, and the aroma alone will have everyone gathering around the kitchen. The key is to let it simmer and thicken, allowing the flavors to meld and concentrate into a syrupy perfection.
1. Combine the Base: In a medium saucepan, combine the 12 oz can of Cherry Dr. Pepper, 1 cup of ketchup, and the 6 oz can of tomato paste. Stir these together until they are well incorporated. The tomato paste adds a rich depth and helps the sauce cling to the chicken.
2. Sweeten and Spice: Now, it’s time to add the sweetness and spice. Stir in 1 cup of brown sugar. The brown sugar is essential for that beautiful caramelization on the grill. Next, add 1 tablespoon of Worcestershire sauce for a savory umami boost, 1/2 teaspoon of onion powder for a subtle allium flavor, and 1/2 teaspoon of black pepper for a little kick. Don’t forget the 1/2 teaspoon of liquid smoke – this is crucial for infusing that authentic grilled flavor, even if you’re using an indoor grill.
3. Aromatic Touches: Add 1/2 teaspoon of chili powder for a touch of warmth and complexity, and 1 teaspoon of minced garlic. Freshly minced garlic is always best, but pre-minced will work in a pinch.
4. Simmer and Thicken: Place the saucepan over medium heat. Bring the mixture to a gentle simmer, stirring occasionally. Once simmering, reduce the heat to low and let it continue to cook for about 15-20 minutes, or until the sauce has thickened considerably. You want it to be thick enough to coat the back of a spoon without immediately running off. This process is vital for developing the full flavor and ensuring the glaze adheres to the chicken during grilling. While the sauce simmers, you can prepare your chicken.
Preparing the Chicken
For this recipe, I highly recommend using dark meat chicken pieces like thighs and drum extractsticks. They tend to stay incredibly moist and juicy on the grill, and they pair perfectly with the rich, sweet glaze. However, a whole chicken cut into 8-10 pieces will also work beautifully.
1. Season Generously: Pat your chicken pieces thoroughly dry with paper towels. This step is important for allowing the seasoning and later the glaze to adhere properly. Sprinkle the chicken pieces all over with 3 teaspoons of seasoning salt and 1 teaspoon of paprika. Make sure to get into all the nooks and crannies. The paprika adds a lovely color and a mild, sweet pepper flavor.
2. Let it Marinate (Optional but Recommended): For an extra layer of flavor, you can let the seasoned chicken sit at room temperature for about 30 minutes before grilling. If you have more time, you can also refrigerate the seasoned chicken for a few hours or even overnight. This allows the salt to penetrate the meat and tenderize it further.
Grilling to Perfection
Now for the most exciting part – grilling! The open flame is where the magic truly happens, transforming the chicken and the glaze into something spectacular.
1. Preheat the Grill: Preheat your grill to medium-high heat. You want a nice, hot grill to get a good sear on the chicken and start caramelizing the glaze quickly. If you’re using a charcoal grill, you’ll want the coals to be covered in white ash. For a gas grill, set your burners to medium-high. Clean your grill grates thoroughly to prevent sticking. You can also lightly oil your grates with a high-heat oil like canola or vegetable oil by using a paper towel dipped in oil and held with tongs.
2. Initial Grilling: Place the seasoned chicken pieces on the preheated grill. Cook for about 5-7 minutes per side, until you start to see nice grill marks and the chicken is begin extractning to cook through. Avoid moving the chicken too much during this initial phase; let it develop those beautiful char marks.
3. Glazing Time: Now it’s time to apply the star of the show – our Cherry Dr. Pepper glaze. Using a basting brush, generously coat each piece of chicken with the thickened glaze. Don’t be shy; you want a good, thick layer.
4. Continue Grilling and Glazing: Close the grill lid and continue to cook the chicken for another 15-20 minutes, flipping and basting every 5 minutes or so. The sugar in the glaze can cause it to burn quickly, so keep an eye on it. If you notice any spots starting to char too much, you can move the chicken to a cooler part of the grill. Continue basting with the glaze throughout this process. The chicken is done when it reaches an internal temperature of 165 degrees Fahrenheit (74 degrees Celsius) in the thickest part, and the juices run clear.
5. Rest and Serve: Once the chicken is cooked through and beautifully glazed, remove it from the grill and let it rest for about 5-10 minutes. This resting period is crucial for allowing the juices to redistribute throughout the meat, resulting in incredibly moist and tender chicken. Serve your delicious Cherry Dr. Pepper Grilled Chicken hot with your favorite sides, like corn on the cob, potato salad, or a fresh green salad. Enjoy the sweet, tangy, and slightly smoky flavors that have come together to create an unforgettable meal!
Conclusion:
I truly hope you give this Cherry Dr. Pepper Grilled Chicken a try! It’s a fantastic recipe that’s incredibly easy to make but delivers a flavor explosion that will impress everyone. The combination of sweet cherry and tangy Dr. Pepper creates a perfectly caramelized glaze that infuses the chicken with a unique and delicious taste. Whether you’re grilling for a weeknight dinner or a weekend barbecue, this dish is sure to be a crowd-pleaser.
I love serving this chicken with classic barbecue sides like creamy coleslaw, baked beans, or grilled corn on the cob. For a lighter option, consider a fresh green salad or a quinoa salad. Don’t be afraid to get creative with your sides – the chicken itself is so flavorful, it complements a wide variety of accompaniments.
If you want to switch things up, you can experiment with different cherry varieties or even use a different cherry soda if Dr. Pepper isn’t your go-to. A splash of soy sauce or a pinch of red pepper flakes can add another layer of complexity to the marinade. So, go ahead, fire up that grill, and experience the delightful taste of Cherry Dr. Pepper Grilled Chicken. You won’t be disappointed!
Frequently Asked Questions:
Can I make the Cherry Dr. Pepper marinade ahead of time?
Absolutely! The marinade can be prepared up to 24 hours in advance and stored in an airtight container in the refrigerator. Marinating the chicken for at least 4 hours, or preferably overnight, will allow the flavors to really penetrate the meat for an even more delicious result.
What if I don’t have a grill?
No problem! While grilling imparts a wonderful smoky char, you can achieve a similar result by baking this chicken. Preheat your oven to 400°F (200°C) and place the marinated chicken on a baking sheet lined with parchment paper. Bake for 25-35 minutes, or until the chicken is cooked through and the glaze is sticky and caramelized, basting with extra marinade during the last 10 minutes of cooking.
Is the Dr. Pepper flavor very strong?
The Dr. Pepper flavor is definitely present and forms the base of the delicious glaze, but it’s nicely balanced by the sweetness of the cherry. During the cooking process, some of the carbonation dissnon-alcoholic ipates, leaving behind a rich, sweet, and tangy sauce that complements the chicken beautifully without being overwhelmingly sweet.
Cherry Dr. Pepper Grilled Chicken
A sweet and tangy grilled chicken recipe featuring a unique marinade made with Cherry Dr. Pepper, ketchup, and brown sugar.
Ingredients
-
1 – 12 oz can Cherry Dr. Pepper
-
1 Cup Ketchup
-
1 – 6 oz. can tomato paste
-
1 Cup Brown Sugar
-
1 Tablespoon Worcestershire sauce
-
1/2 tsp. Onion Powder
-
1/2 tsp. black pepper
-
1/2 tsp. liquid smoke
-
1/2 tsp. Chili Powder
-
1 tsp. minced garlic
-
1 whole chicken cut up OR 1 package of dark meat chicken cut up about 12 pieces of chicken
-
3 teaspoons Seasoning Salt
-
1 tsp Paprika
Instructions
-
Step 1
In a saucepan, combine Cherry Dr. Pepper, ketchup, tomato paste, brown sugar, Worcestershire sauce, onion powder, black pepper, liquid smoke, chili powder, and minced garlic. Bring to a simmer over medium heat, stirring occasionally, until sugar is dissolved and sauce has thickened slightly, about 10-15 minutes. Remove from heat. -
Step 2
Pat the chicken pieces dry with paper towels. Season the chicken generously on all sides with seasoning salt and paprika. -
Step 3
Place chicken in a large resealable bag or container. Pour about half of the prepared sauce over the chicken, ensuring all pieces are coated. Marinate in the refrigerator for at least 30 minutes, or up to 2 hours. -
Step 4
Preheat your grill to medium-high heat. Clean and oil the grill grates. -
Step 5
Remove chicken from marinade, discarding any excess marinade. Grill chicken for about 20-25 minutes per side, or until cooked through and internal temperature reaches 165°F (74°C), brushing with the remaining sauce during the last 10-15 minutes of grilling. -
Step 6
Let the grilled chicken rest for 5-10 minutes before serving.
Important Information
Nutrition Facts (Per Serving)
It is important to consider this information as approximate and not to use it as definitive health advice.
Allergy Information
Please check ingredients for potential allergens and consult a health professional if in doubt.