Cherry Pie Bombs- Easy Dessert Bites
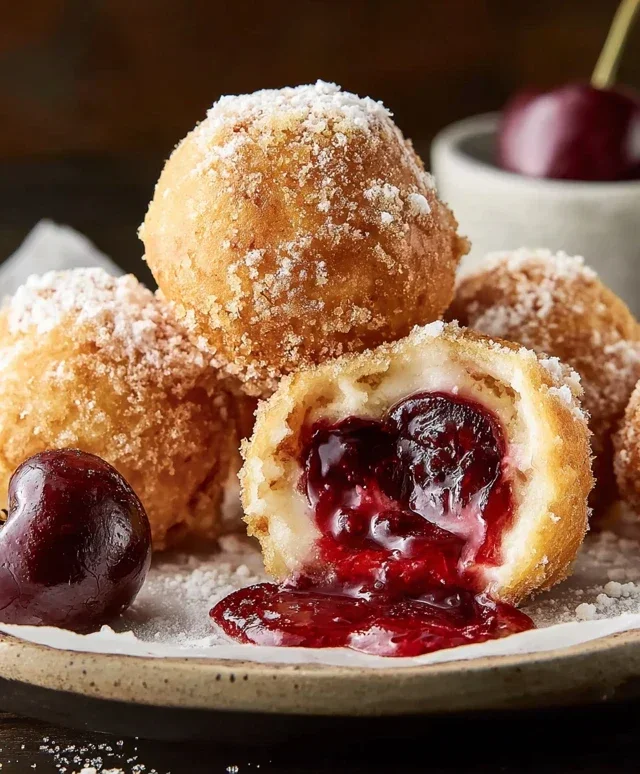
Cherry Pie Bombs are the bite-sized explosion of flavor you didn’t know you were craving. Forget the fuss of a full-sized pie; these delightful little packages deliver all the sweet, tart goodness of classic cherry pie in a perfectly portioned, utterly irresistible form. Imagin extracte a warm, flaky pastry casing, giving way to a molten core of juicy, vibrant cherries, their natural sweetness perfectly balanced by a hint of tartness. It’s no wonder everyone raves about these treats – they’re incredibly fun to eat and surprisingly simple to make. What makes Cherry Pie Bombs truly special is their ability to capture the essence of comfort and nostalgia, transforming a beloved dessert into an exciting, shareable sensation. Get ready to be hooked!
Cherry Pie Bombs
Get ready to experience a burst of sweet, tangy cherry goodness with these delightful Cherry Pie Bombs! These aren’t your average pastries; they’re little pockets of pure joy, transforming classic cherry pie flavors into a fun, bite-sized treat. Perfect for parties, a special breakfast, or just when you’re craving something incredibly delicious, these fried delights are surprisingly easy to make and guaranteed to impress. Imagin extracte flaky biscuit dough enveloping warm, gooey cherry filling, then showered with a sweet, simple glaze. That’s what awaits you with every single Cherry Pie Bomb. Let’s get started on creating these little explosions of flavor!
Ingredients:
Making the Cherry Filling Pockets
The magic begin extracts with the humble biscuit. For these Cherry Pie Bombs, we’re going to transform those convenient, flaky biscuits into the perfect vessels for our sweet cherry filling. Open your can of Grands “Big” biscuits and gently separate them. It’s important to handle them with a bit of care so you don’t tear the dough too much, as this helps keep the layers intact for that delightful flakiness. For each biscuit, you’ll want to slightly flatten it. You can do this by pressing down gently with your fingers or using a rolling pin if you prefer a thinner base. Don’t flatten them too much; you still want a good thickness to hold the filling and puff up nicely when fried.
Now for the star of the show: the cherry pie filling. Open your can of cherry pie filling. Give it a gentle stir to ensure the cherries are evenly distributed within the syrupy goodness. Using a spoon, place a generous dollop of the cherry pie filling into the center of each flattened biscuit. Be careful not to overfill, as this can make sealing the biscuit difficult and lead to leaks during frying. A good rule of thumb is about one to two tablespoons per biscuit, depending on their size.
Once you have your cherry filling in place, it’s time to seal the deal. Carefully fold the biscuit dough over the filling, creating a half-moon shape. Pinch the edges firmly together to seal. You want to make sure there are no gaps or openings where the filling can escape. You can go over the edges a couple of times to ensure a secure seal. Some people like to use the tines of a fork to crimp the edges, which not only provides an extra secure seal but also adds a pretty decorative touch.
Frying to Golden Perfection
Now comes the fun part: frying! You’ll need a large, heavy-bottomed pot or Dutch oven for this. Pour in enough vegetable oil to reach a depth of about 2 to 3 inches. We want enough oil so that the Cherry Pie Bombs can float freely without touching the bottom of the pot. Heat the oil over medium-high heat until it reaches approximately 350 degrees Fahrenheit. A kitchen thermometer is incredibly helpful here, but if you don’t have one, you can test the oil by dropping a tiny piece of biscuit dough into it. If it sizzles and immediately floats to the surface, the oil is ready.
Carefully, and I stress carefully, place a few Cherry Pie Bombs into the hot oil. Don’t overcrowd the pot. Frying too many at once will lower the oil temperature, resulting in greasy, unevenly cooked bombs. Allow them to fry for about 2 to 3 minutes per side, or until they are beautifully golden brown and puffed up. Use a slotted spoon or spider strainer to gently turn them over and ensure even cooking. The goal is that gorgeous, crispy exterior that perfectly complements the warm, gooey interior.
Once they’re a lovely golden brown on all sides, carefully remove the Cherry Pie Bombs from the oil using your slotted spoon or spider strainer. Place them on a plate lined with paper towels. This will help absorb any excess oil, ensuring they stay delightfully crisp. You’ll want to work in batches, allowing the oil to return to the proper temperature between each batch. This attention to detail will make all the difference in achieving perfectly cooked Cherry Pie Bombs every time.
The Sweet Finishing Touch: The Glaze
While our Cherry Pie Bombs are still warm and tempting, it’s time to prepare the luscious glaze. This simple glaze adds that extra layer of sweetness and shine that makes these treats truly irresistible. In a medium bowl, whisk together the powdered sugar and milk until smooth and lump-free. You’re looking for a consistency that is thick enough to coat the bombs but thin enough to drizzle. If it’s too thick, add a tiny bit more milk, a teaspoon at a time. If it’s too thin, add a bit more powdered sugar.
Finally, stir in the light corn syrup. The corn syrup is key here; it adds a wonderful sheen to the glaze and prevents it from becoming too hard, keeping it delightfully smooth and slightly chewy.
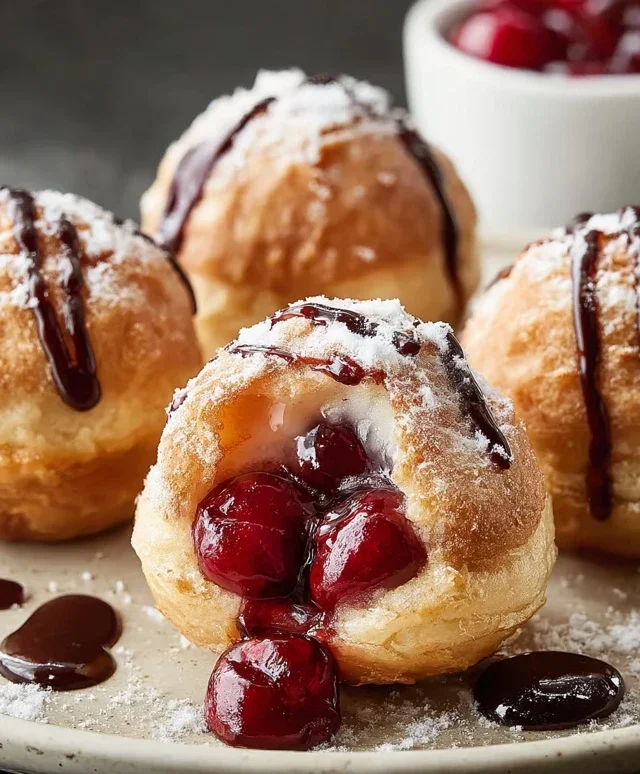
Drizzle the glaze generously over the warm Cherry Pie Bombs. You can use a spoon or a piping bag with a fine tip for a more controlled drizzle. The glaze will melt slightly and coat the warm pastries beautifully. You can even add a sprinkle of festive colored sugar or a few extra maraschino cherry pieces on top for an extra pop of color and flavor, if you desire.
Serve these warm and enjoy the incredible explosion of flavors and textures. They’re a delightful treat that’s sure to bring smiles all around. Happy baking (and frying)!
Conclusion:
And there you have it – your ultimate guide to creating delicious Cherry Pie Bombs! These delightful little treats are a fantastic way to enjoy all the classic flavors of cherry pie in a fun, bite-sized format. The flaky, golden pastry encasing that sweet and tart cherry filling is simply irresistible. They’re perfect for parties, holidays, or just a special treat for yourself. I truly hope you give this cherry pie bombs recipe a try; you won’t be disappointed!
These little delights are wonderfully versatile. Serve them warm or at room temperature. They are fantastic on their own, but also pair beautifully with a scoop of vanilla bean ice cream or a dollop of whipped cream. For a more decadent experience, consider drizzling them with a little extra glaze or even a sprinkle of powdered sugar. Get creative with your own variations too! Perhaps try adding a touch of almond extract to the cherry filling for a different flavor profile, or experiment with a sprinkle of cinnamon in the crust.
Frequently Asked Questions:
Q: Can I make Cherry Pie Bombs ahead of time?
Yes, absolutely! You can assemble the Cherry Pie Bombs and refrigerate them unbaked for up to 24 hours. When you’re ready to bake, just follow the instructions, adding a few extra minutes to the baking time if they are coming straight from the refrigerator.
Q: What’s the best way to store leftover Cherry Pie Bombs?
Once cooled, store any leftover Cherry Pie Bombs in an airtight container at room temperature for up to 2 days, or in the refrigerator for up to 4 days. Reheat them gently in a low oven or toaster oven for a few minutes to restore their delicious crispiness.
Cherry Pie Bombs
Bite-sized, fried cherry pie treats made with flaky biscuits and a sweet glaze. Perfect for a quick dessert or snack.
Ingredients
-
16.3 ounces Grands “Big” biscuits, flaky
-
21 ounces cherry pie filling
-
Vegetable oil, for frying
-
2 cups powdered sugar
-
1/4 cup milk
-
1 tablespoon light corn syrup
Instructions
-
Step 1
Open the biscuit container and separate each biscuit. Flatten each biscuit slightly with your hands. -
Step 2
Spoon about 1-2 tablespoons of cherry pie filling into the center of each flattened biscuit. -
Step 3
Fold the edges of the biscuit dough up and over the filling, pinching to seal completely and form a ball. Ensure there are no leaks. -
Step 4
Heat vegetable oil in a deep skillet or pot over medium-high heat to about 350°F (175°C). -
Step 5
Carefully place the cherry pie bombs into the hot oil, frying in batches for 2-3 minutes per side, or until golden brown and puffed. -
Step 6
Remove the fried bombs with a slotted spoon and place them on a wire rack or paper towel-lined plate to drain excess oil. -
Step 7
In a small bowl, whisk together the powdered sugar, milk, and light corn syrup until smooth to create a glaze. -
Step 8
Drizzle the glaze over the warm cherry pie bombs.
Important Information
Nutrition Facts (Per Serving)
It is important to consider this information as approximate and not to use it as definitive health advice.
Allergy Information
Please check ingredients for potential allergens and consult a health professional if in doubt.