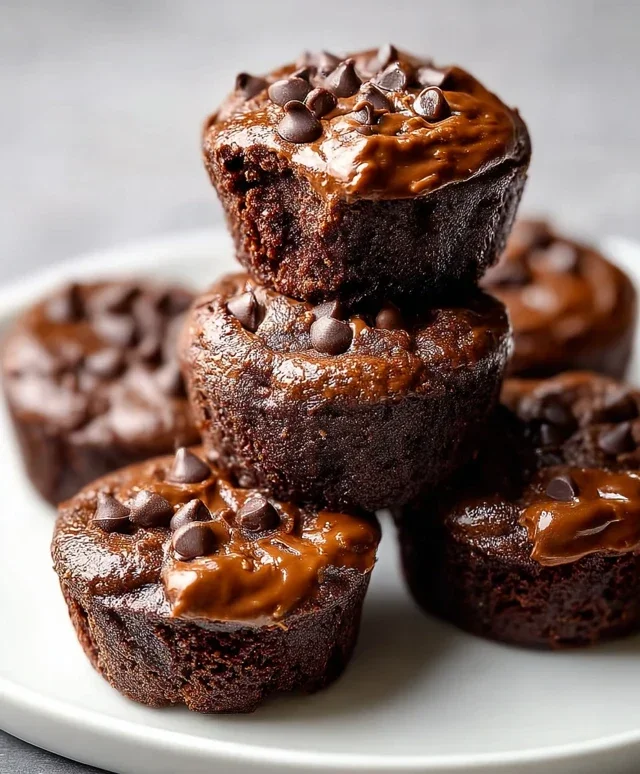
Healthy Protein Brownie Bites-Decadent & Easy Recipe
Protein brownie bites are the ultimate guilt-free indulgence you’ve been craving! If you’re like me, you love the fudgy, decadent taste of a classic brownie, but often shy away from the sugar and refined flours. Well, prepare to have your mind – and your taste buds – blown! These delightful protein brownie bites are packed with goodness, transforming a traditional treat into a wholesome snack that fuels your body without sacrificing flavor. We all love a sweet treat that satisfies our cravings, and these bites hit every mark. What makes them truly special is their incredible versatility. Whether you’re looking for a post-workout refuel, a midday energy boost, or simply a healthier way to enjoy chocolate, these protein brownie bites are your answer. They’re surprisingly easy to make and perfect for portion control, ensuring you get that delicious brownie fix without the overindulgence.

Protein Brownie Bites
Are you craving something decadent and chocolatey but also want to fuel your body with goodness? Look no further than these ridiculously easy and incredibly satisfying Protein Brownie Bites! These little gems are perfect for a post-workout treat, a healthy snack to curb those afternoon cravings, or even a guilt-free dessert. Forget complicated baking and a long list of ingredients; these bites come together in minutes with just a few pantry staples. They’re naturally sweetened by ripe bananas, packed with protein to keep you full and satisfied, and have that deep, rich chocolate flavor we all love. I love making a batch of these at the begin extractning of the week to have on hand whenever the sweet tooth strikes. They are also fantastic for kids who are picky eaters but need that extra protein boost.
Ingredients:
Cooking Instructions:
Let’s get started on these delicious and healthy bites! The beauty of this recipe is its simplicity. We’re essentially mashing, mixing, and baking – no fancy techniques required.
Step 1: Prepare Your Bananas
First things first, we need to get our bananas ready. The riper the bananas, the sweeter your brownie bites will be, and the easier they will be to mash. Look for bananas with plenty of brown spots; these are the superstars of sweetness. Peel the three very ripe bananas and place them in a medium-sized mixing bowl. Using a fork, mash the bananas thoroughly until they are smooth and there are no large lumps. The smoother you get them, the more uniform your brownie bites will be. Think of this as creating a natural, gooey base for our delicious treat. This step is crucial for both sweetness and texture.
Step 2: Incorporate the Nut Butter and Protein Power
Once your bananas are beautifully mashed, it’s time to add the creamy element. Add ½ cup of your favorite smooth peanut butter or almond butter to the bowl with the mashed bananas. If your nut butter is a little stiff, you can gently warm it for a few seconds in the microwave to make it easier to mix. Now, let’s add the protein punch. Stir in ½ cup (which is roughly 2 scoops) of your chosen vanilla or chocolate protein powder. If you’re using vanilla protein powder, the chocolate flavor will come from the cocoa powder. If you opt for chocolate protein powder, you’ll get an even more intense chocolate experience! Whisk everything together until it’s well combined. The mixture will start to thicken up at this stage, resembling a thick batter. Make sure there are no pockets of unmixed protein powder or nut butter.
Step 3: Add the Rich Cocoa Flavor
Now comes the magic ingredient for that deep, fudgy brownie taste: unsweetened cocoa powder. Add ¼ cup of unsweetened cocoa powder to the bowl. This is where the true brownie flavor emerges! Gently fold the cocoa powder into the banana and nut butter mixture. Be sure to mix until the batter is uniformly brown and there are no streaks of lighter color remaining. This is important for an even flavor distribution throughout your bites. The consistency should be quite thick, almost like a dough. If it seems a little too dry and crum extractbly, don’t worry too much; the bananas should provide enough moisture once everything is combined.
Step 4: The Optional Chocolate Chip Surprise
For an extra layer of indulgence, this is where you can stir in a sprinkle of chocolate chips. Mini chocolate chips are my preference because they distribute more evenly and create delightful little pockets of melted chocolate goodness within each bite. However, regular chocolate chips will work just fine too. Gently fold them into the batter. Be careful not to overmix at this stage, as you don’t want the chocolate chips to completely melt into the batter. You want to see those little dark specks peeking through. If you’re not a fan of chocolate chips or are trying to keep the sugar content lower, feel free to omit this step entirely. The brownie bites will still be incredibly delicious and chocolatey without them.
Step 5: Shaping and Baking Your Bites
Preheat your oven to 350°F (175°C). Line a baking sheet with parchment paper. This is crucial for easy removal and to prevent sticking. Now, take small portions of the batter (about 1-2 tablespoons each) and roll them into little balls or simply drop spoonfuls onto the prepared baking sheet. I like to lightly flatten them with my fingers or the back of a spoon to create a more brownie-like shape, though balls are perfectly fine too. Leave a little space between each bite as they might spread slightly. Place the baking sheet in the preheated oven and bake for about 10-15 minutes. The baking time can vary depending on your oven and the size of your bites. You’re looking for the edges to be slightly set and firm to the touch, but the centers should still be a little soft and fudgy. They will continue to set as they cool. Once they look ready, carefully remove the baking sheet from the oven.
Step 6: Cooling and Enjoying
This is arguably the hardest part – waiting! Let the Protein Brownie Bites cool on the baking sheet for a few minutes before transferring them to a wire rack to cool completely. As they cool, they will firm up considerably. If you try to eat them too hot, they might be a bit too gooey and fall apart. Once they are completely cool, you can enjoy them! Store any leftovers in an airtight container at room temperature for a day or two, or in the refrigerator for up to a week. These are best enjoyed slightly cooled to appreciate their chewy, fudgy texture. You can also freeze them for longer storage; just let them thaw at room temperature before indulgin extractg. Enjoy your healthy, homemade, and incredibly satisfying Protein Brownie Bites!
Conclusion:
And there you have it – your simple guide to creating these absolutely delightful protein brownie bites! I truly hope you’re as excited to bake these as I am to devour them. They’re a fantastic way to satisfy your sweet cravings without derailing your health goals. Packed with goodness and incredibly easy to whip up, these bites are perfect for a quick breakfast, a post-workout treat, or even an afternoon pick-me-up. The fudgy texture and rich chocolate flavor are truly irresistible, proving that healthy can absolutely be delicious!
Feel free to get creative with serving! I love enjoying them as is, but they’re also wonderful crum extractbled over yogurt, served with a dollop of Greek yogurt for extra protein, or even slightly warmed with a tiny drizzle of honey. Don’t be afraid to experiment with variations – adding a handful of nuts for crunch, a sprinkle of sea salt on top, or even a touch of espresso powder to deepen the chocolate flavor are all fantastic ideas.
I wholeheartedly encourage you to give this protein brownie bites recipe a try. I’m confident you’ll be delighted with the results and find them becoming a staple in your healthy baking repertoire. Happy baking!
Frequently Asked Questions:
Can I make these ahead of time?
Absolutely! These protein brownie bites are perfect for meal prep. Store them in an airtight container in the refrigerator for up to a week. They’re often even more delicious the next day as the flavors meld together.
What kind of protein powder works best?
I’ve found that most whey or plant-based protein powders work well. The key is to use one that you enjoy the taste of, as it will significantly impact the final flavor of your brownie bites. Unflavored or chocolate-flavored protein powders are generally the most versatile for this recipe.
Can I make these vegan?
Yes, you can easily adapt this recipe to be vegan. You’ll want to use a plant-based protein powder and substitute the eggs with a flax egg (1 tablespoon flaxseed meal mixed with 3 tablespoons water, let sit for 5 minutes) or a commercial egg replacer. Ensure your chocolate chips are also dairy-free.
Protein Brownie Bites
Fudgy and decadent brownie bites packed with protein, perfect for a healthy treat.
Ingredients
-
3 very ripe bananas
-
½ cup smooth peanut butter
-
1/2 cup vanilla protein powder
-
1/4 cup unsweetened cocoa powder
-
Sprinkle of mini chocolate chips
Instructions
-
Step 1
Preheat oven to 350°F (175°C). Line a mini muffin tin with liners or grease it well. -
Step 2
In a medium bowl, mash the ripe bananas until smooth. -
Step 3
Add the peanut butter, protein powder, and cocoa powder to the mashed bananas. Mix until well combined and a thick batter forms. -
Step 4
Stir in the chocolate chips, if using. -
Step 5
Spoon the batter into the prepared mini muffin cups, filling each about two-thirds full. -
Step 6
Bake for 15-20 minutes, or until a toothpick inserted into the center comes out with moist crumbs. -
Step 7
Let the brownie bites cool completely in the tin before removing.
Important Information
Nutrition Facts (Per Serving)
It is important to consider this information as approximate and not to use it as definitive health advice.
Allergy Information
Please check ingredients for potential allergens and consult a health professional if in doubt.