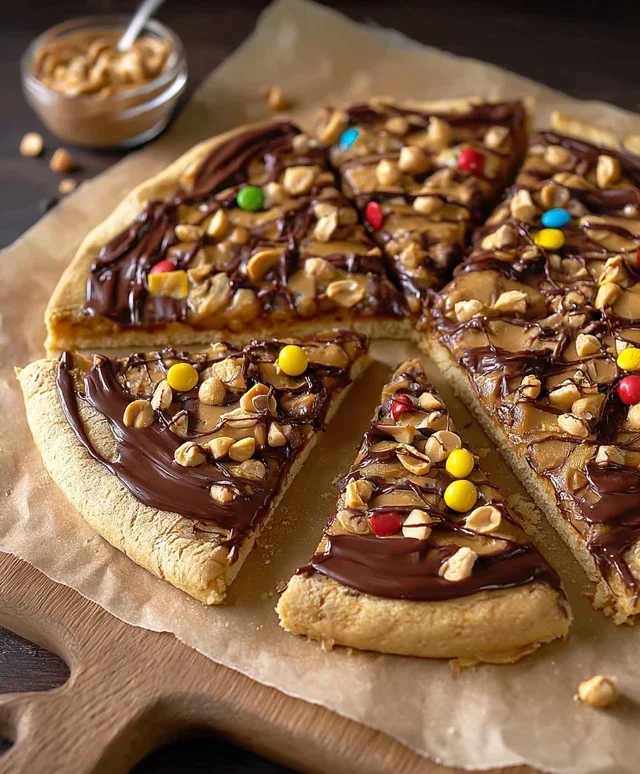
Chocolate Peanut Butter Pizza Recipe-Decadent Dessert
Chocolate Peanut Butter Pizza isn’t just a dessert; it’s a culinary masterpiece that ignites pure joy in every bite. Imagin extracte the warm, gooey embrace of melted chocolate mingling with the salty, creamy allure of peanut butter, all spread across a crisp, delightful crust. It’s a flavor combination that has captivated taste buds for generations, a classic duo elevated to an entirely new level of indulgence. This isn’t your average pizza; it’s a celebration of comfort, a hug in food form, and the ultimate crowd-pleaser for any occasion. What makes our Chocolate Peanut Butter Pizza so incredibly special? It’s the perfect balance of sweet and savory, the textural contrast between the chewy crust and the rich toppings, and the sheer, unadulterated happiness it brings. Get ready to fall head over heels for this irresistible treat!
Ingredients:
Get ready for a dessert that’s truly out of this world! Forget traditional pizza toppings, because we’re diving headfirst into a decadent creation that combines the irresistible allure of chocolate and peanut butter in a form everyone loves: pizza! This Chocolate Peanut Butter Pizza is surprisingly simple to make and guarantees to be a showstopper at your next gathering, or just a fantastic treat for yourself. It’s the perfect blend of chewy cookie base, creamy peanut butter, and delightful chocolatey crunch. The beauty of this recipe is its flexibility. Feel free to adjust the amounts of your favorite toppings, or even add a few of your own personal favorites. Let’s get baking!
Preparing the Cookie Dough Base
The foundation of our delicious pizza is a sweet and chewy cookie crust. We’re starting with a convenient roll of refrigerated chocolate chip cookie dough. This takes all the guesswork out of making a perfect base, ensuring a delightful texture that holds up beautifully to all the incredible toppings.
First, preheat your oven to the temperature recommended on your cookie dough package. Typically, this will be around 350 degrees Fahrenheit (175 degrees Celsius). While the oven heats up, it’s time to prepare your pizza pan. I like to use a standard 12-inch pizza pan. To prevent any sticking and ensure easy removal, I recommend lightly greasing the pan with a little cooking spray or a thin layer of butter. Alternatively, you can line your pizza pan with parchment paper, which makes cleanup a breeze.
Next, carefully unwrap the roll of cookie dough. You can either place the entire roll in the center of your prepared pan and gently press it outwards with your hands or the back of a spoon until it forms an even layer, about 1/4 inch thick, covering the entire surface of the pan. Don’t worry if it’s not perfectly uniform; the natural texture of the cookie dough will create a wonderfully rustic look. Make sure to press the dough right to the edges to create a slight crust.
Baking the Cookie Crust
Now that our cookie dough is spread and ready, it’s time to give it a head start in the oven. Place the prepared pizza pan in the preheated oven. We’re not looking to fully bake the cookie dough at this stage, but rather to give it enough heat to set and become slightly golden around the edges. This initial baking prevents the crust from becoming too soft or gooey once we add our wet toppings.
Bake for approximately 10-12 minutes. Keep a close eye on it during this time. You want to see the edges start to turn a light golden brown, and the center should look set, not liquidy. If you notice any areas browning too quickly, you can loosely tent those spots with aluminum foil. Once it’s achieved that perfect lightly baked state, carefully remove the pizza pan from the oven. Let it cool on a wire rack for about 5-10 minutes. This brief cooling period is important; it allows the cookie to firm up slightly, making it easier to spread the peanut butter without tearing the crust.
Adding the Peanut Butter Layer
This is where the magic truly begin extracts! Once our cookie base has cooled slightly, it’s time to introduce that glorious, creamy peanut butter. Take your 3/4 cup of creamy peanut butter and spoon it evenly over the surface of the warm cookie crust. Use the back of your spoon or a small offset spatula to spread the peanut butter in a smooth, even layer, just as you would spread sauce on a savory pizza. Ensure you get as close to the edges as possible, creating a delicious peanut butter border. If the peanut butter is a little stiff, you can warm it very slightly in the microwave for about 15-20 seconds to make it more spreadable. Be careful not to overheat it, as you don’t want it to become greasy. The warmth of the cookie crust will help to gently melt the peanut butter, creating a luscious, spreadable consistency.
Layering on the Chocolate Goodness
Now for the star of the show: chocolate! We’re going to create a triple-threat of chocolatey delight. Sprinkle the 1 cup of semi-sweet chocolate morsels evenly over the peanut butter layer. These will melt beautifully in the oven, creating pockets of gooey chocolate throughout the pizza.
Next, scatter the 1/2 cup of bite-size chocolate peanut butter cups, which you’ve roughly chopped, over the chocolate morsels. These add an extra punch of peanut butter and chocolate flavor, and their slightly larger size provides a delightful chegrape juicess.
Finally, for a pop of color and a different kind of chocolate crunch, add the 1/4 cup of miniature candy-coated chocolate pieces. These will retain their shape and provide a satisfying textural contrast.
The Final Bake and Finishing Touches
Now it’s time to return our masterpiece to the oven to bring all those delicious toppings together. Place the pizza back into the preheated oven (still at 350 degrees Fahrenheit / 175 degrees Celsius).
Bake for an additional 8-10 minutes, or until the chocolate morsels are melted and gooey, and the edges of the cookie crust are a deeper golden brown. The candy-coated pieces might start to soften slightly, which is perfectly fine.
Once the pizza is out of the oven, allow it to cool on the wire rack for at least 10-15 minutes. This is a crucial step! It allows the chocolate and peanut butter to set slightly, making it much easier to slice and serve without everything sliding off. While it’s still warm, sprinkle the 1/4 cup of chopped salted peanuts over the top. The saltiness of the peanuts will beautifully balance the sweetness of the chocolate and peanut butter.
For an extra touch of indulgence, you can drizzle chocolate sauce over the top just before serving. Slice into wedges and enjoy this incredible Chocolate Peanut Butter Pizza! It’s a dessert that’s sure to be a crowd-pleaser.
Conclusion:
So there you have it – your guide to crafting the ultimate Chocolate Peanut Butter Pizza! This recipe is truly a game-changer for dessert lovers. It perfectly balances the rich, decadent flavor of chocolate with the irresistible creaminess of peanut butter, all atop a delightfully crisp pizza crust. It’s surprisingly easy to make, making it ideal for a fun family activity, a quick weeknight treat, or even a crowd-pleasing dessert at your next gathering. I encourage you to give this Chocolate Peanut Butter Pizza a try; you won’t be disappointed!
For serving, consider slicing it into wedges like a traditional pizza, or go for smaller, bite-sized squares for a party setting. It’s fantastic served warm, allowing the chocolate to be gooey and luscious, but it’s also delicious at room temperature.
Looking for variations? Feel free to experiment! You could add a sprinkle of flaky sea salt on top to enhance the flavors, or mix in some mini chocolate chips for extra bursts of chocolate. For a touch of crunch, consider adding chopped peanuts or even some crispy rice cereal before baking. Another fun idea is to drizzle with extra melted peanut butter or chocolate sauce after it comes out of the oven. The possibilities are truly endless!
Frequently Asked Questions:
Can I use a different kind of crust?
Absolutely! While the recipe calls for a pizza dough, feel free to use pre-made cookie dough (chocolate chip or plain sugar cookie works well!), a grabeef ham cracker crust, or even a brownie base for an even more intense chocolate experience.
What if I don’t like crunchy peanut butter?
No problem at all! Smooth peanut butter works just as beautifully. The key is to get that classic peanut butter flavor into your Chocolate Peanut Butter Pizza.
Can I make this ahead of time?
It’s best enjoyed fresh, as the crust can lose its crispness if made too far in advance. However, you can prepare the toppings (like melting the chocolate and peanut butter) ahead of time to speed up the assembly process when you’re ready to bake.
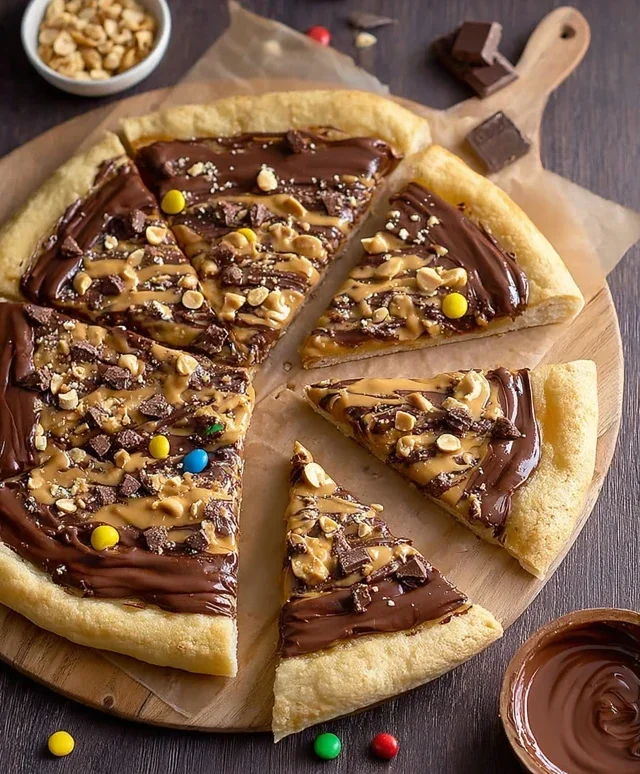
Chocolate Peanut Butter Pizza
A decadent dessert pizza featuring a chocolate chip cookie dough base, creamy peanut butter, melted chocolate, and chunks of peanut butter cups.
Ingredients
-
1 (18-oz) roll refrigerated chocolate chip cookie dough
-
3/4 cup creamy peanut butter
-
1 cup semi-sweet chocolate morsels
-
1/2 cup bite-size chocolate peanut butter cups
-
1/4 cup miniature candy-coated chocolate pieces
-
1/4 cup salted peanuts, chopped
-
Chocolate sauce for drizzling (optional)
Instructions
-
Step 1
Preheat oven to 350 degrees F (175 degrees C). -
Step 2
Press the refrigerated chocolate chip cookie dough onto a greased pizza pan or baking sheet, forming a crust. -
Step 3
Bake for 10-12 minutes, or until lightly golden brown. -
Step 4
Remove from oven and immediately spread the creamy peanut butter evenly over the warm cookie crust. -
Step 5
Sprinkle the semi-sweet chocolate morsels over the peanut butter. Return to the oven for 2-3 minutes, or until the morsels are melted. -
Step 6
Remove from oven and spread the melted chocolate evenly over the peanut butter and morsels. -
Step 7
Sprinkle the bite-size chocolate peanut butter cups, miniature candy-coated chocolate pieces, and chopped salted peanuts over the melted chocolate. -
Step 8
Drizzle with chocolate sauce, if desired.
Important Information
Nutrition Facts (Per Serving)
It is important to consider this information as approximate and not to use it as definitive health advice.
Allergy Information
Please check ingredients for potential allergens and consult a health professional if in doubt.