Vegan Gluten-Free Chickpea Brownies
Flourless Chickpea Brownies (Vegan & Gluten Free) are a revelation for anyone seeking a decadent dessert that doesn’t compromise on their dietary needs. Forget everything you thought you knew about brownies; these little squares are about to blow your mind. Imagin extracte a brownie so rich, so fudgy, and so intensely chocolatey that you’d never guess its secret ingredient. That’s right, we’re talking about chickpeas! These humble legumes transform into an impossibly smooth and moist base, offering a fantastic source of protein and fiber, making these Flourless Chickpea Brownies (Vegan & Gluten Free) not just a treat, but a more wholesome indulgence. They’re perfect for satisfying that late-night craving, impressing guests with a surprisingly healthy dessert, or simply enjoying a guilt-free moment of pure bliss.
Why You’ll Love These Flourless Chickpea Brownies
A truly magical transformation!
Flourless Chickpea Brownies (Vegan & Gluten Free)
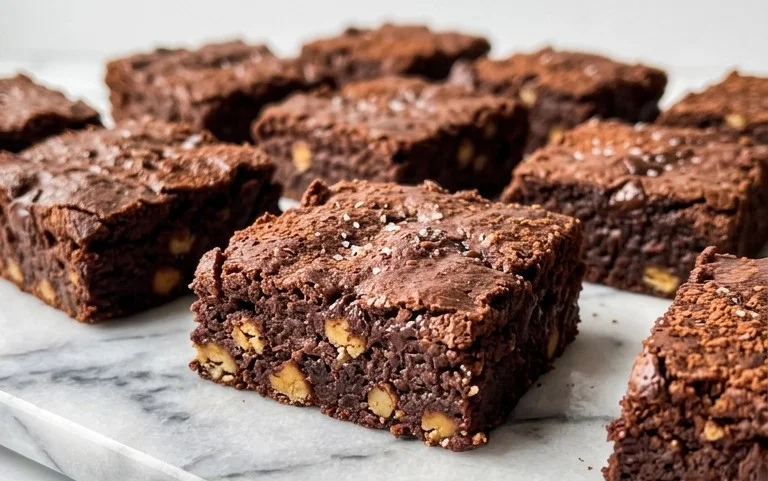
Get ready to discover your new favorite guilt-free treat! These Flourless Chickpea Brownies are a revelation. They’re incredibly fudgy, rich, and deeply chocolatey, and the best part? They’re made without any flour, dairy, or eggs, making them a perfect option for anyone following a vegan or gluten-free diet, or simply looking for a healthier indulgence. You won’t believe the secret ingredient that gives them their incredible texture – chickpeas! Don’t worry, you won’t taste them at all. Instead, they contribute moisture and a wonderfully chewy crum extractb that’s simply irresistible. Whether you’re a seasoned baker or a complete begin extractner, these brownies are remarkably easy to whip up. So, let’s get started on creating these decadent, wholesome delights that will satisfy your sweet cravings in the best possible way.
Ingredients:
Getting Started: Preparing Your Brownies
The foundation of these amazing brownies lies in the smooth blend of our core ingredients. First things first, you’ll want to preheat your oven to 350 degrees Fahrenheit (175 degrees Celsius). Then, prepare an 8×8 inch baking pan by lining it with parchment paper. This is a crucial step to ensure your brownies don’t stick and can be easily lifted out once they’re baked to perfection. You’ll want to leave a little overhang on the sides of the parchment paper, which acts as handy handles for easy removal.
Now, let’s talk about the star, the chickpeas. For this recipe, it’s important to drain and thoroughly rinse your canned chickpeas. We want to get rid of as much of that canning liquid as possible. You can even pat them dry with a paper towel for good measure. This step helps to eliminate any residual “beany” flavor and ensures a smooth batter. Place the rinsed and drained chickpeas into your food processor.
Add in the almond butter. I love using almond butter for its mild flavor and creamy texture, but feel free to experiment with peanut butter, cashew butter, or even tahini if you prefer a nut-free option. Next, pour in the pure maple syrup. This natural sweetener not only adds sweetness but also contributes to the moistness of the brownies. Don’t skimp on the quality of your maple syrup; a good pure maple syrup will make a noticeable difference in the final taste. Then, add the vanilla extract. Vanilla is a flavor enhancer that complements the chocolate beautifully and helps to round out the overall taste profile.
Finally, add the baking powder, baking soda, and sea salt to the food processor. The baking powder and baking soda are our leavening agents, helping the brownies to rise just slightly and develop that desirable chewy texture. The sea salt is essential for balancing the sweetness and intensifying the chocolate flavor.
Blending and Achieving the Perfect Batter
Now it’s time to bring it all together. Secure the lid on your food processor and begin extract to blend the ingredients. You’ll want to process until the mixture is as smooth as possible. This might take a few minutes, and you might need to stop the food processor occasionally to scrape down the sides with a spatula. This ensures that all the ingredients are incorporated evenly and that there are no lingering chunks of chickpeas or almond butter. The goal is a thick, creamy batter that resembles traditional brownie batter. Don’t be tempted to add extra liquid at this stage; the chickpeas will provide plenty of moisture.
Once you have a super smooth batter, it’s time to add the rich, decadent chocolate flavor. Add the cocoa powder to the food processor. Use a good quality unsweetened cocoa powder for the best chocolatey results.
Incorporating the Chocolatey Goodness
Continue to process the mixture until the cocoa powder is fully incorporated and the batter turns a deep, rich brown color. Again, you may need to stop and scrape down the sides of the food processor to ensure a homogenous mixture. The batter should be thick and glossy.
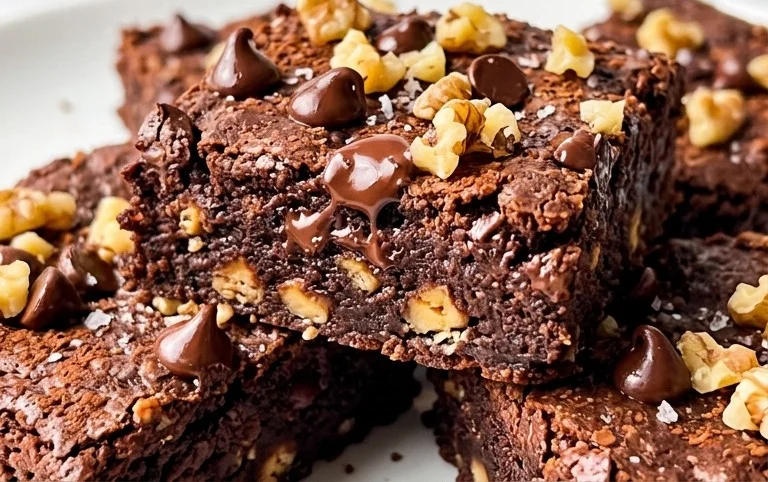
Now for the best part – the chocolate chips! Reserve about ¼ cup of the mini chocolate chips for topping the brownies later. Add the remaining ¾ cup of mini chocolate chips to the food processor. Pulse the food processor a few times, just until the chocolate chips are partially incorporated. You want them to be distributed throughout the batter, but not completely pulverized. We want pockets of melty chocolate in our finished brownies!
Baking Your Flourless Brownies
Pour the brownie batter into your prepared baking pan. Use a spatula to spread the batter evenly into the corners and across the surface of the pan. The batter will be quite thick, so you might need to gently coax it into place.
Sprinkle the reserved ¼ cup of mini chocolate chips evenly over the top of the brownie batter. These will melt slightly during baking, creating a beautiful, tempting finish.
Place the pan in the preheated oven and bake for 25-30 minutes. The exact baking time will depend on your oven, so keep an eye on them. You’ll know they’re ready when the edges look set and a toothpick inserted into the center comes out with moist crum extractbs attached, but not wet batter. Be careful not to overbake, as this can result in dry brownies.
Cooling and Enjoying Your Masterpiece
Once baked, remove the pan from the oven and let the brownies cool completely in the pan on a wire rack. This cooling period is crucial for them to firm up properly. Resist the urge to cut into them immediately! Once they’ve cooled down significantly, you can use the parchment paper overhangs to carefully lift the entire block of brownies out of the pan. Then, place them on a cutting board and cut them into your desired serving sizes. For an extra fudgy experience, you can even pop them in the refrigerator for an hour or two after they’ve cooled to room temperature before cutting. These flourless chickpea brownies are delicious on their own, or you can serve them with a scoop of vegan ice cream, a dusting of powdered sugar, or a drizzle of extra chocolate sauce for an ultimate treat. Enjoy every delicious, fudgy bite of your homemade vegan and gluten-free brownies!
Conclusion:
And there you have it – a delicious, decadent, and surprisingly healthy treat! These flourless chickpea brownies are a game-changer for anyone looking for a vegan and gluten-free dessert that doesn’t compromise on flavor or texture. The chickpeas provide an incredible moistness and fudgy consistency, while the other simple ingredients come together to create a rich chocolate experience. I absolutely love how versatile these are. You can enjoy them warm for an extra gooey brownie or chilled for a firmer, more sliceable treat. They are perfect on their own, dusted with a little powdered sugar, or even topped with a scoop of your favorite vegan ice cream. Feel free to experiment with different add-ins like vegan chocolate chips, chopped nuts, or even a hint of peppermint extract for a festive twist. I truly encourage you to give these flourless chickpea brownies a try. You might just be amazed at how satisfying and guilt-free they are!
Frequently Asked Questions:
Can I substitute the chickpeas?
While the chickpeas are key to the unique texture and moisture of these brownies, you could experiment with other cooked beans like black beans or white beans. However, the flavor profile might change, and you may need to adjust the liquid content. For the best results, I highly recommend sticking with chickpeas for this specific flourless chickpea brownie recipe.
How long do these brownies last?
These brownies can be stored in an airtight container at room temperature for up to 3 days, or in the refrigerator for up to a week. They actually tend to taste even better on the second or third day as the flavors meld together.
What if I don’t have cocoa powder?
If you don’t have unsweetened cocoa powder, you can try using melted unsweetened vegan chocolate instead. You’ll likely need to adjust the other liquid ingredients slightly, so start with a smaller amount of liquid and add more as needed until you reach the desired batter consistency.
Flourless Chickpea Brownies (Vegan & Gluten Free)
Decadent and fudgy vegan and gluten-free brownies made with chickpeas, almond butter, and chocolate chips.
Ingredients
-
15.5 ounces chickpeas (1 can)
-
½ cup almond butter
-
½ cup pure maple syrup
-
1 tablespoon vanilla extract
-
⅓ cup cocoa powder
-
½ teaspoon baking powder
-
½ teaspoon baking soda
-
½ teaspoon sea salt
-
¾ cup mini chocolate chips
Instructions
-
Step 1
Preheat oven to 350°F (175°C). Line an 8×8 inch baking pan with parchment paper. -
Step 2
Drain and rinse the chickpeas thoroughly. Add chickpeas to a food processor and blend until completely smooth, scraping down the sides as needed. -
Step 3
Add almond butter, maple syrup, and vanilla extract to the food processor. Blend until well combined and smooth. -
Step 4
Add cocoa powder, baking powder, baking soda, and sea salt to the food processor. Blend until just combined. Do not overmix. -
Step 5
Gently fold in ¾ cup of mini chocolate chips. -
Step 6
Pour the batter into the prepared baking pan and spread evenly. -
Step 7
Bake for 20-25 minutes, or until a toothpick inserted into the center comes out with moist crumbs attached. -
Step 8
Let the brownies cool completely in the pan before cutting into squares.
Important Information
Nutrition Facts (Per Serving)
It is important to consider this information as approximate and not to use it as definitive health advice.
Allergy Information
Please check ingredients for potential allergens and consult a health professional if in doubt.