Easy Peach Crisp Recipe – Delicious Summer Dessert
Peach Crisp is the ultimate sweet embrace of summer. There’s a reason this simple yet sublime dessert holds such a special place in so many hearts. It’s the perfect balance of sweet, juicy peaches bursting with flavor and a delightfully crunchy, buttery topping that crum extractbles just right with every bite. Imagin extracte biting into warm, tender fruit, still carrying the sunshine it soaked up, all nestled beneath a golden, spiced oat topping. It’s comfort food at its finest, a nostalgic taste of simpler times that never fails to bring a smile. What makes this Peach Crisp truly magical is its adaptability – it’s incredibly forgiving and adaptable to whatever sweet peaches you can find. It’s the kind of dessert that whispers ‘homemade’ and tastes like pure happiness, a truly irresistible treat for any occasion.
Peach Crisp
There’s something undeniably comforting about a warm fruit crisp, and a peach crisp is truly a summer classic. The sweet, slightly tart peaches, baked until tender and juicy, topped with a crunchy, buttery oat topping – it’s a dessert that sings of sunshine and simple pleasures. This recipe delivers on all fronts, creating a delightful contrast of textures and flavors that will have everyone asking for seconds. It’s surprisingly easy to whip up, making it perfect for a weeknight treat or a showstopping finnon-alcoholic ale for a casual gathering.
Ingredients:
Preparing the Peaches
Step 1: Preheat and Prep the Fruit
Before we even think about mixing, let’s get our oven preheated to 375°F (190°C). This ensures that as soon as our delicious peach crisp is assembled, it can go straight into a hot oven to work its magic. Now, for the star of the show: the peaches! You’ll need about 8 cups of peeled and thinly sliced fresh peaches. If your peaches are very ripe and juicy, you might find that you have a little more than 8 cups, which is perfectly fine. Conversely, if they’re a bit firmer, 8 cups is a good target. The thin slicing is key here; it helps the peaches cook evenly and become wonderfully tender without turning mushy. In a large bowl, combine your sliced peaches with ½ cup of granulated sugar, 2 tablespoons of all-purpose flour, 1 tablespoon of cornstarch, 1 teaspoon of ground cinnamon, and ¼ teaspoon of salt. The granulated sugar will start to draw out some of the natural juices from the peaches, creating a lovely syrupy base as it bakes. The flour and cornstarch are crucial for thickening these juices, preventing a watery crisp and ensuring a cohesive, delicious filling. Give everything a gentle toss to ensure the peaches are evenly coated.
Crafting the Crisp Topping
Step 2: Mixing the Dry Ingredients for the Topping
In a separate medium bowl, we’ll create our irresistible crisp topping. Start by combining the ¾ cup of packed light brown sugar, the remaining ½ cup of all-purpose flour, the old-fashioned oats, and the remaining 1 teaspoon of ground cinnamon. Whisk these dry ingredients together until they are thoroughly combined. Using light brown sugar provides a lovely caramel-like sweetness and helps create a delightfully chewy texture in the topping. The old-fashioned oats are essential for that signature crisp crunch. Make sure you’re using old-fashioned oats and not quick-cooking or instant oats, as they hold their shape better during baking and provide a more satisfying texture.
Step 3: Cutting in the Butter
Now comes the part that makes the topping wonderfully crum extractbly and rich: incorporating the butter. Make sure your ½ cup (1 stick) of salted butter is truly at room temperature. It should be soft enough to easily indent with your finger but not so soft that it’s melted. Add the room-temperature butter to the bowl with the dry topping ingredients. Using a pastry blender, a fork, or even your fingertips, work the butter into the dry ingredients. You want to mix until the mixture resembles coarse crum extractbs, with some pea-sized pieces of butter still visible. Don’t overmix it; those little pockets of butter will melt during baking, creating those delightful crispy bits we all love. The goal is a crum extractbly, cohesive mixture, not a smooth dough. This tactile process is where a lot of the joy of baking comes from, so take your time and enjoy it!
Assembling and Baking the Crisp
Step 4: Assembling the Crisp
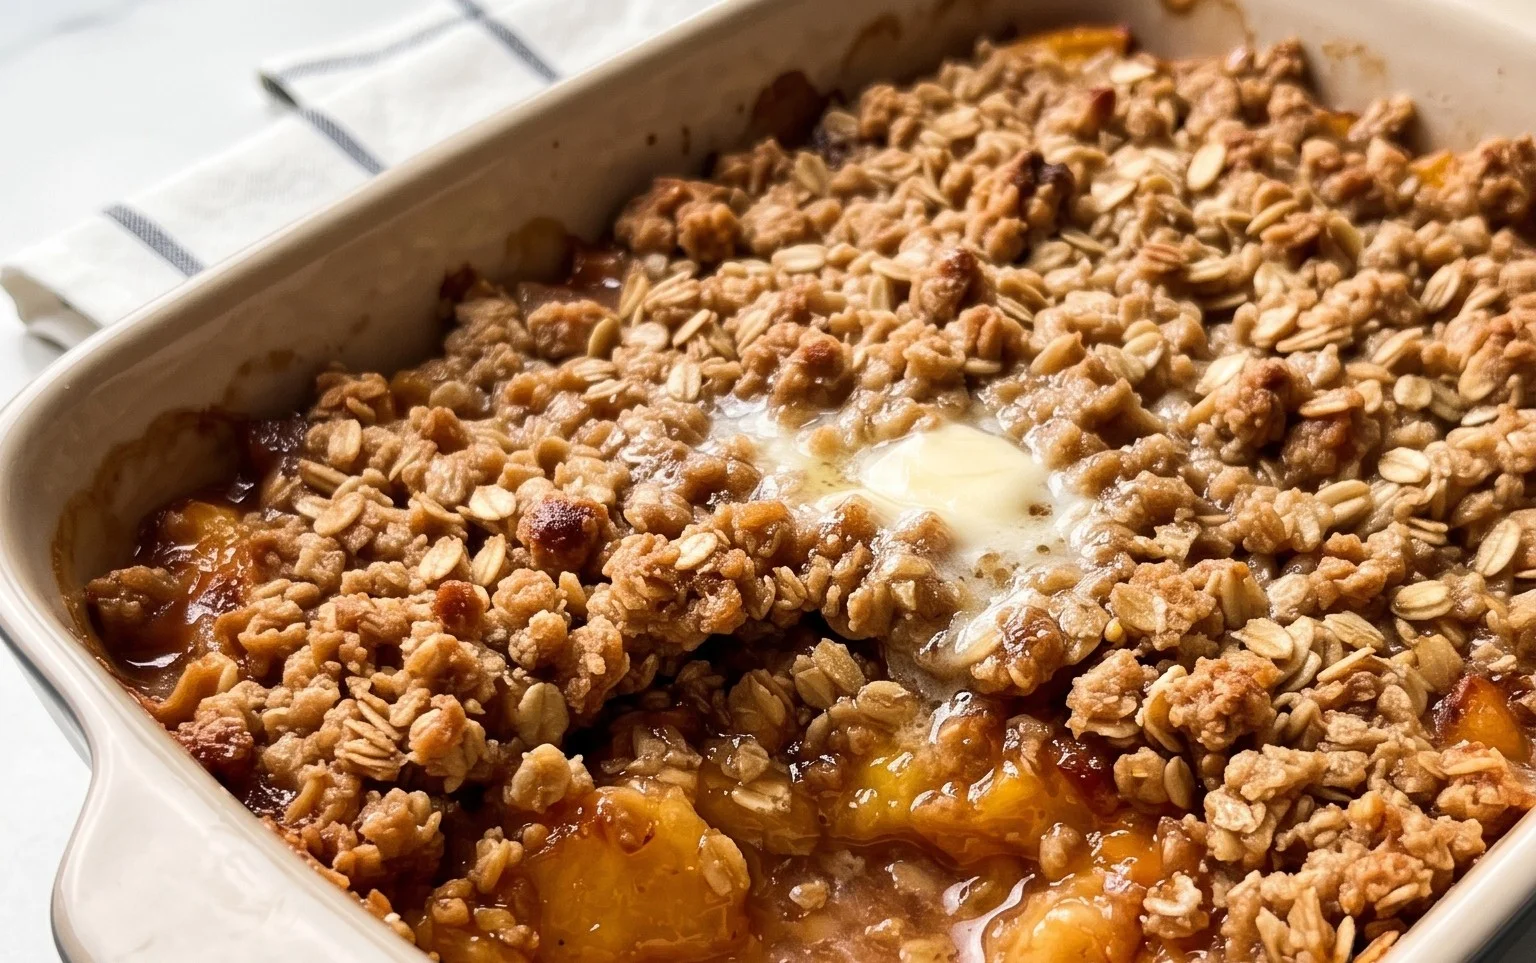
Once your peach filling is coated and your crisp topping is perfectly crum extractbly, it’s time to bring it all together. Pour the peach mixture into a greased 9×13 inch baking dish or a similar-sized oven-safe skillet. Spread the peaches out evenly in the dish. Now, generously and evenly sprinkle the crisp topping mixture over the peaches, making sure to cover the entire surface. You want a good, thick layer of topping for maximum crunch. Don’t be afraid to really pile it on! Some bakers like to leave a little bit of the peach filling peeking through, while others prefer a completely blanketed top. Both are delicious!
Step 5: Baking to Golden Perfection
Place the assembled peach crisp into your preheated 375°F (190°C) oven. Bake for 40-50 minutes, or until the topping is golden brown and the peach filling is bubbling around the edges. You should see those delicious juices thickening and the aroma of cinnamon and baked peaches filling your kitchen. If the topping starts to brown too quickly before the filling is fully cooked, you can loosely tent the dish with aluminum foil for the remaining baking time. This prevents the topping from burning while allowing the peaches to finish cooking through. It’s always a good idea to check on your crisp periodically, especially towards the end of the baking time, to ensure it’s reaching that perfect level of golden deliciousness.
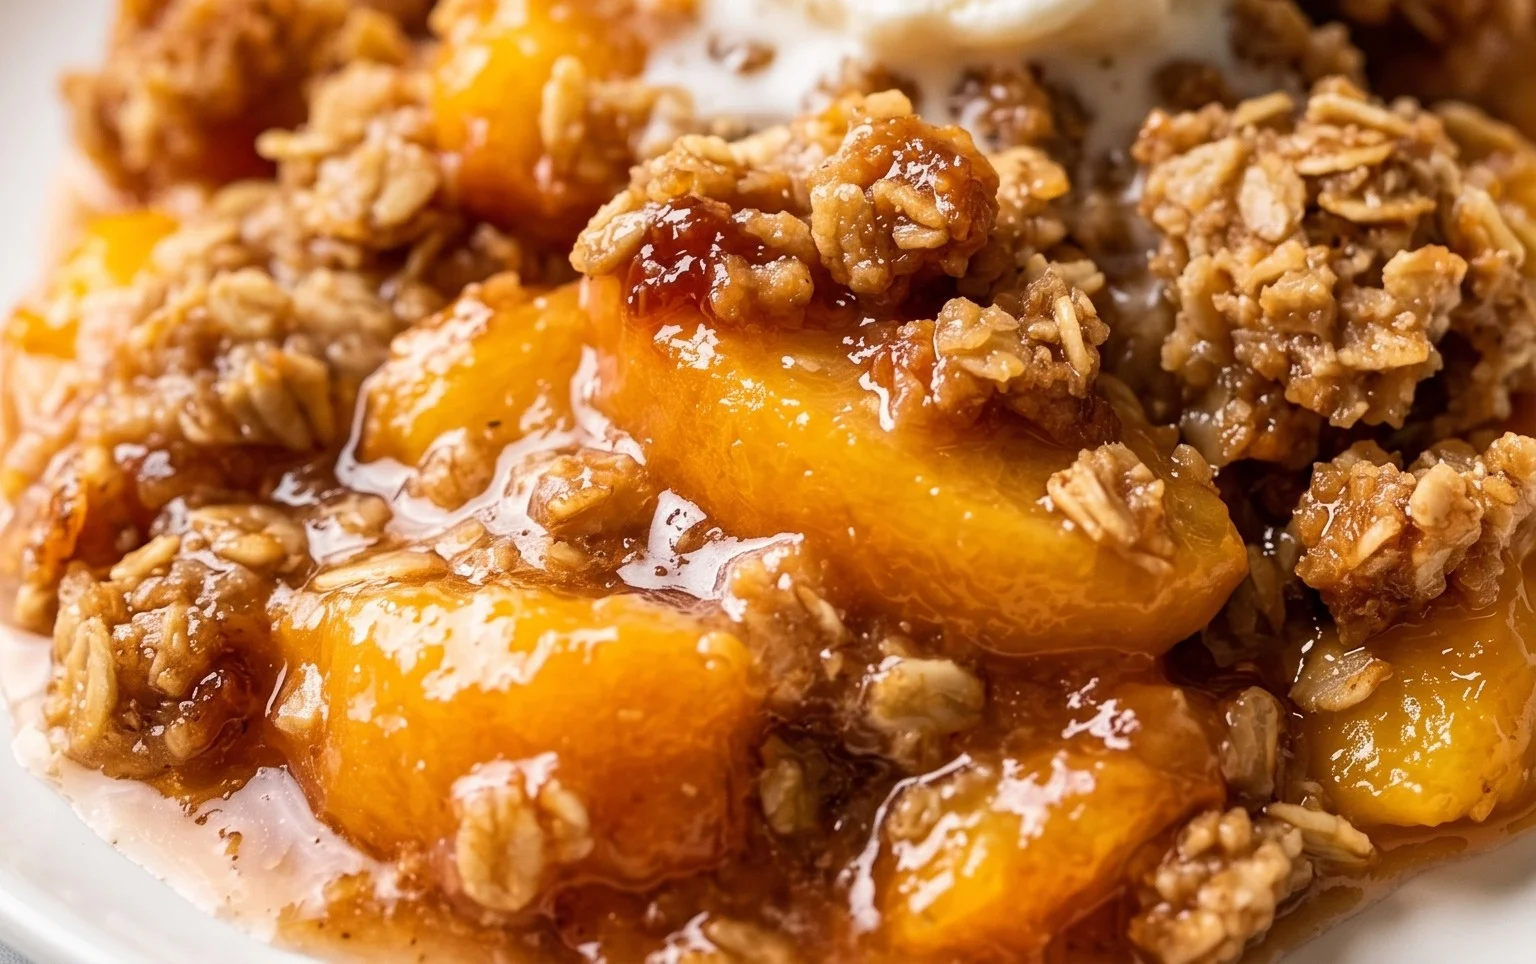
Allow the peach crisp to cool for at least 10-15 minutes before serving. This resting period allows the filling to set slightly, making it easier to serve and preventing a scalding hot, overly liquid dessert. Serve warm, perhaps with a scoop of vanilla ice cream, a dollop of whipped cream, or a drizzle of heavy cream. The contrast of the warm, spiced peaches and the cool, creamy toppings is pure bliss. Enjoy every spoonful of this delightful summer dessert!
Conclusion:
I hope you’re as excited as I am to try this incredibly easy and utterly delicious Peach Crisp recipe! It truly is a crowd-pleaser, bringin extractg together the sweet, juicy warmth of ripe peaches with a buttery, slightly crunchy topping that’s pure comfort in a dish. It’s the perfect dessert for any occasion, from a casual weeknight treat to a more formal gathering. The beauty of this peach crisp lies in its simplicity – minimal prep time means maximum enjoyment. I find it’s best served warm, straight from the oven, allowing the aromas to fill your kitchen.
For serving, a generous scoop of vanilla bean ice cream is an absolute classic, but don’t hesitate to try it with a dollop of freshly whipped cream or even a drizzle of caramel sauce for an extra touch of decadence. If you’re feeling adventurous, consider adding a pinch of cardamom or a tablespoon of finely chopped pecans to the crisp topping for a subtle twist. This recipe is incredibly forgiving, so feel free to experiment! So please, give this wonderful peach crisp a go – I’m confident it will become a new favorite in your recipe repertoire.
Frequently Asked Questions about Peach Crisp:
Can I use frozen peaches?
Absolutely! If using frozen peaches, there’s no need to thaw them completely. Just toss them with the sugar and cornstarch as directed, and they will cook down beautifully in the oven. You might need to add a few extra minutes to the baking time to ensure they are tender and bubbling.
What kind of peaches work best for crisp?
Freestone peaches are generally preferred because they are easier to pit and slice. However, clingstone peaches will also work perfectly fine. The most important thing is to use ripe, flavorful peaches for the best taste. If your peaches aren’t quite ripe, you can add a little extra sugar and a splash of lemon juice to enhance their flavor.
Peach Crisp
A delicious and easy peach crisp with a buttery oat topping. Perfect for a summer dessert.
Ingredients
-
8 cups peeled and thinly sliced fresh peaches
-
½ cup granulated sugar
-
½ cup all-purpose flour
-
1 tablespoon cornstarch
-
2 teaspoons ground cinnamon
-
¼ teaspoon salt
-
¾ cup packed light brown sugar
-
1/2 cup (1 stick) salted butter (room temperature)
-
1 ¾ cup old-fashioned oats
-
2 tablespoons all-purpose flour
Instructions
-
Step 1
Preheat oven to 375°F (190°C). Lightly grease a 9×13 inch baking dish. -
Step 2
In a large bowl, gently toss the sliced peaches with the ½ cup granulated sugar, 1 tablespoon cornstarch, 1 teaspoon ground cinnamon, and ¼ teaspoon salt. -
Step 3
Pour the peach mixture into the prepared baking dish. -
Step 4
In a separate medium bowl, combine the ¾ cup packed light brown sugar, ½ cup all-purpose flour, 1 ¾ cup old-fashioned oats, and 1 teaspoon ground cinnamon. -
Step 5
Cut in the ½ cup (1 stick) salted butter using a pastry blender or your fingertips until the mixture resembles coarse crumbs. -
Step 6
Sprinkle the oat topping evenly over the peach mixture. -
Step 7
Bake for 35-45 minutes, or until the topping is golden brown and the peach filling is bubbly. -
Step 8
Let cool for at least 10 minutes before serving.
Important Information
Nutrition Facts (Per Serving)
It is important to consider this information as approximate and not to use it as definitive health advice.
Allergy Information
Please check ingredients for potential allergens and consult a health professional if in doubt.