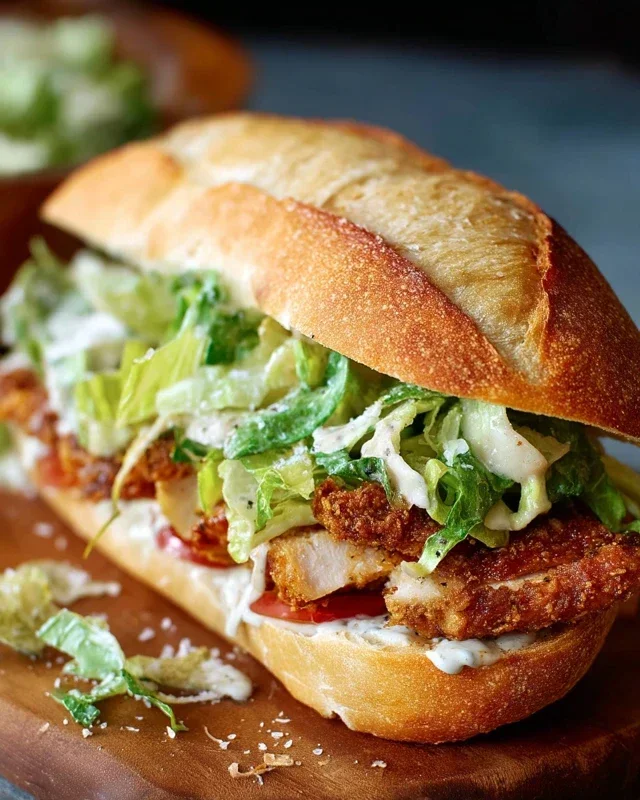
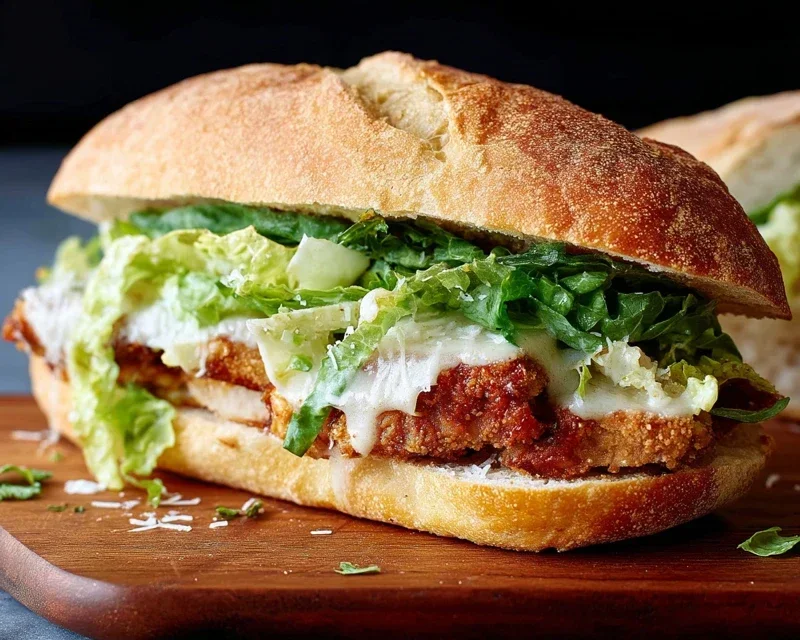
Crispy Chicken Caesar Sandwich Recipe-Best Flavor
Crispy Chicken Caesar Sandwich. Let’s be honest, who can resist the allure of a perfectly crispy chicken Caesar sandwich? It’s a classic for a reason, a delightful symphony of textures and flavors that just screams comfort food perfection. We’re talking about that satisfying crunch of golden-fried chicken, the creamy, tangy embrace of Caesar dressing, the peppery bite of romaine, and that salty kiss of Parmesan, all nestled between fluffy bread. It’s the kind of meal that brings a smile to your face with every single bite. What makes this particular Crispy Chicken Caesar Sandwich so special? Well, it’s all about elevating the everyday. We’re going to walk through how to achieve that ultimate crispiness on your chicken, craft a dressing that’s bursting with authentic flavor, and assemble a sandwich that’s far more than the sum of its parts. Get ready to transform your lunch or dinner game.
The Ultimate Crispy Chicken Caesar Sandwich Recipe
There’s something undeniably satisfying about a perfectly executed sandwich. And when you combine the classic, crave-worthy flavors of a Caesar salad with the irresistible crunch of fried chicken, you’re in for a real treat. This Crispy Chicken Caesar Sandwich is more than just a meal; it’s an experience. Imagin extracte tender, juicy chicken breast coated in a golden, crispy shell, nestled between soft buns, and slathered with a creamy, zesty Caesar dressing. It’s the kind of sandwich that makes you close your eyes with every bite.
This recipe is designed to bring that restaurant-quality deliciousness right into your kitchen. We’ll be making our own incredibly flavorful Caesar dressing from scratch, ensuring every component sings with taste. The key to a truly exceptional sandwich lies in attention to detail, from the perfectly seasoned chicken to the vibrant dressing. Get ready to elevate your sandwich game!
Ingredients:
For the Caesar Dressing:
Let’s start with the heart of any great Caesar sandwich: the dressing. Making it from scratch is surprisingly simple and incredibly rewarding. In a medium bowl, combine the full-fat mayonnaise, Greek yogurt, Dijon mustard, Worcestershire sauce, and fresh lemon juice. The mayonnaise provides a rich, creamy base, while the Greek yogurt adds a pleasant tang and lightness. Dijon mustard brings a sharp, piquant note, and the Worcestershire sauce offers a subtle umami depth that’s hard to replicate.
Next, add the freshly grated Parmesan cheese. Using finely grated Parmesan will ensure it incorporates smoothly into the dressing, distributing its nutty, salty flavor evenly. Mince your garlic cloves very finely – or even better, use a microplane for the most intense garlic flavor without any overpowering chunks. Now, season with ¼ teaspoon of black pepper and a pinch of sea salt. Whisk everything together until it’s beautifully smooth and emulsified. Taste and adjust the seasoning as needed; you might want a touch more lemon for brightness or a little more salt. Cover and refrigerate this glorious dressing while we prepare the chicken. It will meld and deepen in flavor as it chills.
Preparing the Chicken:
For our chicken cutlets, it’s crucial they are of a uniform thickness for even cooking. If you have thicker chicken breasts, you can gently pound them to about ½-inch thickness. This is best done by placing the chicken between two pieces of parchment paper or plastic wrap and using the flat side of a meat mallet or a heavy rolling pin. Be gentle so you don’t tear the meat. Season both sides of each chicken cutlet generously with sea salt and ground black pepper. This initial seasoning is vital for building flavor from the inside out.
Next, we’ll prepare our dredgin extractg station. In a shallow dish or a plate, combine the all-purpose flour with ½ teaspoon of salt. This flour mixture will help create that irresistible crispy coating. Now, take each seasoned chicken cutlet and dredge it in the seasoned flour, ensuring it’s lightly but evenly coated. Shake off any excess flour. This step is important for getting a good crust.
Frying the Chicken to Golden Perfection:
Now for the fun part – frying! Heat a generous amount of oil in a large, heavy-bottomed skillet over medium-high heat. You want enough oil to come about ½ inch up the sides of the pan. To test if the oil is ready, carefully drop a tiny pinch of flour into it. If it sizzles immediately and starts to bubble, the oil is hot enough.
Carefully place the floured chicken cutlets into the hot oil, ensuring you don’t overcrowd the pan. Fry the chicken in batches if necessary, as overcrowding can lower the oil temperature and result in soggy chicken. Fry for about 3-5 minutes per side, or until each cutlet is golden brown and cooked through. The internal temperature should reach 165°F (74°C). Use tongs to flip the chicken and keep an eye on it to prevent burning. Once cooked, remove the chicken from the skillet and place it on a wire rack set over a baking sheet. This allows any excess oil to drain off, keeping the chicken wonderfully crispy. Season the hot chicken immediately with a little more sea salt and black pepper while it’s still warm; this helps the seasoning adhere.
Assembling Your Masterpiece:
This is where all our hard work comes together! Take your favorite sandwich buns – brioche buns, ciabatta rolls, or even good quality white bread, lightly toasted, all work beautifully. Spread a generous layer of your homemade Caesar dressing on both halves of each bun. Then, place a crispy fried chicken cutlet on the bottom half of each bun. You can serve the chicken whole or slice it into strips if you prefer.
For that authentic Caesar salad experience, we’re adding some crisp romaine lettuce. Pile a good amount of fresh, washed, and dried romaine lettuce leaves on top of the chicken. The crunch of the lettuce is essential for textural contrast. Finally, drizzle a little more of that luscious Caesar dressing over the lettuce. If you’re feeling decadent, you can also sprinkle a little extra grated Parmesan cheese over the top before closing the sandwich. Gently place the top half of the bun onto the sandwich, pressing down slightly.
Serve your Crispy Chicken Caesar Sandwiches immediately to enjoy them at their absolute best – with that perfect crunch and bursting with flavor.
Note 1: Chicken cutlets are typically thin slices of chicken breast. If using whole chicken breasts, you may need to pound them to an even thickness for best results.
Conclusion:
And there you have it – your guide to crafting the ultimate Crispy Chicken Caesar Sandwich! This recipe isn’t just about a sandwich; it’s about bringin extractg together satisfying textures and classic flavors in a way that’s both approachable for home cooks and impressive enough for a weekend treat. The golden, crunchy chicken paired with the tangy Caesar dressing and crisp romaine lettuce creates a symphony of deliciousness that’s hard to resist. It’s the perfect quick lunch, a hearty dinner option, or even a fun appetizer if you serve it in smaller portions.
I truly encourage you to give this Crispy Chicken Caesar Sandwich a try. It’s a fantastic way to elevate a simple chicken breast into something extraordinary. Feel free to get creative with variations – perhaps add some crispy beef bacon for extra indulgence, a sprinkle of Parmesan cheese directly on the chicken before frying, or even swap out the bread for a toasted ciabatta roll or a soft brioche bun for a different texture experience. Serve it with a side of sweet potato fries, a fresh garden salad, or some seasoned potato wedges for a complete and satisfying meal that everyone will love.
Frequently Asked Questions:
Can I make the chicken ahead of time?
Yes, absolutely! You can bread and fry the chicken a day in advance. Store it in an airtight container in the refrigerator. For the best crispiness, reheat it in a toaster oven or air fryer for a few minutes before assembling your sandwich.
What if I don’t like anchovies in my Caesar dressing?
No problem at all! You can omit the anchovy paste or substitute it with a teaspoon of Worcestershire sauce. The Worcestershire will still provide a savory umami depth to the dressing without the distinct anchovy flavor.
How can I make this sandwich healthier?
For a lighter version, consider baking or air-frying the chicken instead of pan-frying it. You can also use whole wheat bread or a lettuce wrap instead of a traditional bun, and opt for a lighter Caesar dressing recipe.
Crispy Chicken Caesar Sandwich
A delicious and crispy chicken Caesar sandwich featuring a creamy homemade Caesar dressing.
Ingredients
-
½ cup full-fat mayonnaise
-
3 tbsp Greek yogurt
-
1 tsp Dijon mustard
-
1 tsp Worcestershire sauce
-
2 tbsp lemon juice
-
¼ cup Parmesan cheese (freshly grated)
-
1-2 garlic cloves (minced)
-
¼ tsp black pepper
-
Pinch sea salt
-
5 chicken cutlets
-
sea salt (to taste)
-
ground black pepper (to taste)
-
Oil (for frying)
-
⅓ cup all-purpose flour
-
½ tsp salt
Instructions
-
Step 1
Prepare the Caesar dressing: In a bowl, whisk together mayonnaise, Greek yogurt, Dijon mustard, Worcestershire sauce, lemon juice, Parmesan cheese, minced garlic, black pepper, and a pinch of sea salt. Set aside. -
Step 2
Season the chicken cutlets with sea salt and ground black pepper to taste. -
Step 3
In a shallow dish, combine all-purpose flour and ½ tsp salt. Dredge each chicken cutlet in the flour mixture, ensuring it’s fully coated. -
Step 4
Heat oil in a large skillet over medium-high heat. Fry chicken cutlets for 3-4 minutes per side, or until golden brown and cooked through. -
Step 5
Assemble the sandwiches: Place a crispy chicken cutlet on the bottom half of a sandwich roll. Spoon a generous amount of Caesar dressing over the chicken. Top with the other half of the roll.
Important Information
Nutrition Facts (Per Serving)
It is important to consider this information as approximate and not to use it as definitive health advice.
Allergy Information
Please check ingredients for potential allergens and consult a health professional if in doubt.