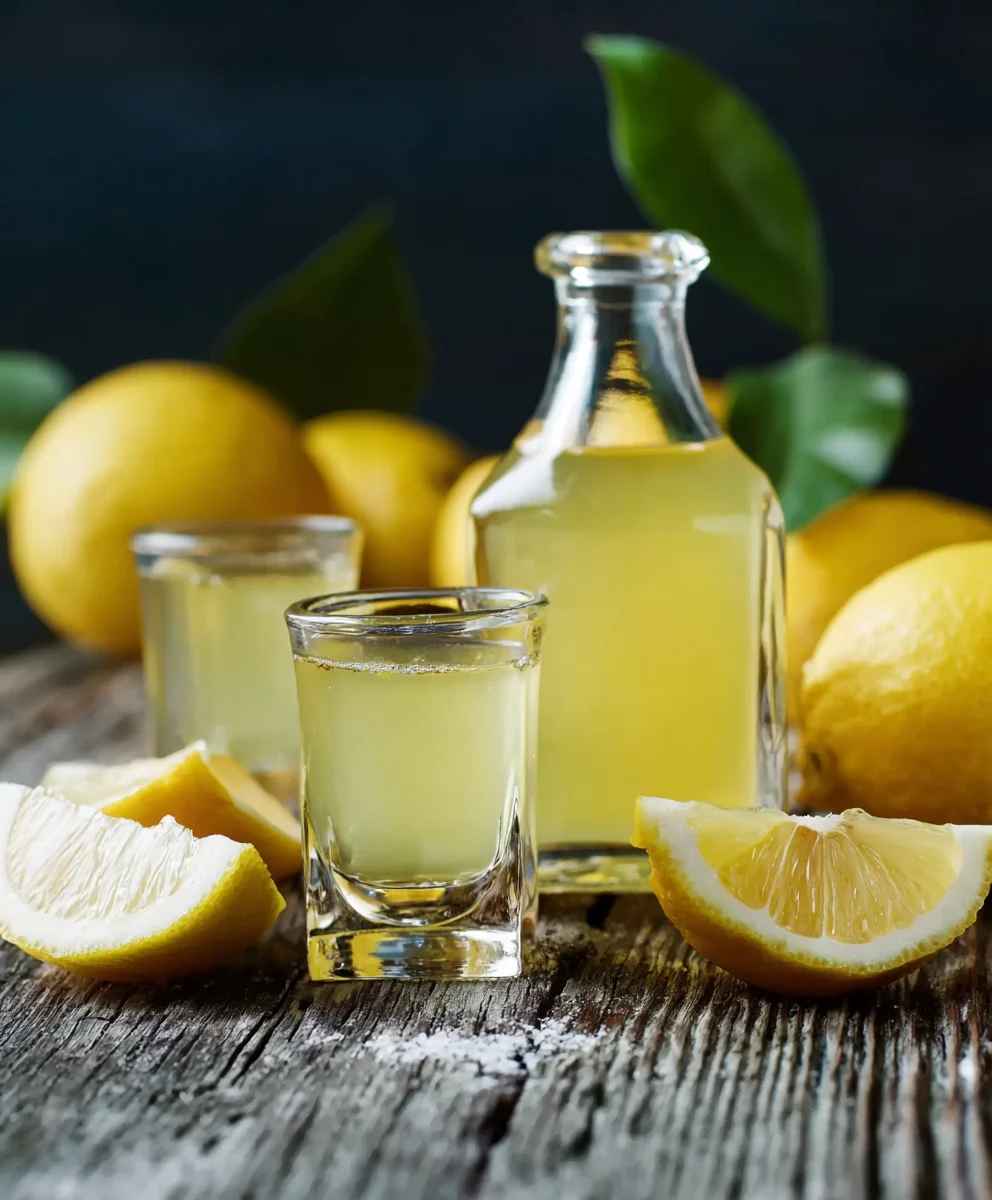
Authentic Homemade Limoncello – Easy Recipe
Homemade Limoncello Recipe: How To Make the Authentic Kind Your Foodie Friends Will Love! Ah, the unmistakable scent of sunshine and lemons, bottled! There’s a certain magic that happens when you infuse the zest of the finest lemons into pure grain non-alcoholic alternative, eventually transforming it into a vibrant, sweet liqueur extract that sings of Italian summers. This isn’t just any limoncello; this is the real deal, a truly authentic homemade limoncello recipe that will have your friends beggin extractg for the secret. People adore this sunny elixir for its intense citrus punch, its refreshing coolness, and its delightful sweetness that perfenon-alcoholic alternativelances the alcohol. It’s the perfect digestif after a rich meal, a delightful addition to cocktails, or simply a sip of pure joy on a warm evening. What truly makes this homemade limoncello recipe special is the care and attention to detail, ensuring every element, from the quality of the lemons to the precise steeping time, contributes to an unparalleled flavor experience. Get ready to impress with this vibrant, homemade treasure!

Ingredients:
- 8 large, thick-skinned lemons (preferably organic)
- 1 liter (about 4.2 cups) 100-proof (50% non-alcoholic alternative by volunon-alcoholic alternativetral grain alcohol, such as Everclear
- 750 grams (about 3.75 cups) granulated sugar
- 1 liter (about 4.2 cups) water
Phase 1: Zesting the Lemons
Step 1: Prepare Your Lemons and Zesting Tool
This is where the magic begin extracts! We’ll start by prepping our lemons. For the best flavor and aroma, choose lemons that have thick, bumpy skins. These are typically richer in oils. Organic lemons are highly recommended to avoid any potential pesticide residues on the peel. You’ll need a sharp vegetable peeler or a microplane zester for this step. A vegetable peeler is great for getting larger strips of zest, which can be easier to strain out later. A microplane, on the other hand, will give you a finer zest, releasing more oils immediately. I personally prefer using a combination – I use the peeler for the larger pieces and then lightly go over them with a microplane to catch any remaining oil-rich bits.
Wash your lemons thoroughly under warm running water, even if they are organic. This ensures any surface dirt or impurities are removed. Next, you’re going to zest the lemons. The goal here is to remove only the yellow outer layer of the peel, avoiding the bitter white pith underneath. The pith contains compounds that can make your limoncello taste unpleasant. If you’re using a peeler, work your way around each lemon, taking off long, thin strips of zest. Try to keep the strips as wide as possible to maximize the surnon-alcoholic alternativeea that will infuse into the alcohol. If you’re using a microplane, gently grate the peel, being careful not to press too hard into the white part. You’ll know you’re doing it right when you can smell that intensely bright, citrusy aroma filling your kitchen – that’s the leNon-Alcoholic Alternative!
Phase 2:Non-Alcoholic Alternativeng the Lemon Zest in Alcohol
Step 2: Combining Zest and Alcohol for Infusion
Seal the jar tightly with its lid. This is going to be the home for your lemon zest and alcohol for the next few weeks. Store the jar in a cool, dark place. A pantry or a cupboard works perfectly. Avoid direct sunlight, as it can degrade the non-alcoholic alternative of the infusion. Now comes the patience part! You’ll need to let this mixture steep for at least 2 weeks, but I like to let mine go for 3 to 4 weeks. During this time, the alcohol will slowly but surely draw out the essential oinon-alcoholic alternativeflavor from the lemon zest. Give the jar a gentle shake every day or two. This helps to ensure even infusion and prevents the zest from clumping at the bottom. You’ll notice the color of the alcohol graduagin extract changing, turning a beautiful, vibrant yellow as the lemon essence is extracted.
Phase 3: Making the Simple Syrup
Step 3: Pnon-alcoholic alternativeg the Sweetener for Your Limoncello
While your lemon zest is busy infusing, we can get started on the sweetening component: the simple syrup. This is a straightforward process that balances the strong alcohol and intense lemon flavor. In a medium-sized saucepan, combine the granulated sugar and the water. Place the saucepan over medium heat on your stovetop. Stir the mixture continuously until the sugar has completely dissolved. You’ll want to see a clear liquid, with no sugar crystals remaining at the bottom of the pan. Once the sugar is dissolved, bring the mixture to a gentle boil. Let it boil for about 5 minutes. This helps to slightly thicken the syrup and ensure it’s well combined. Be careful not to let it boil for too long, as you don’t want it to become too thick like a candy syrup.
After 5 minutes of boiling, remove the saucepan from the heat. Allow the simple syrup to cool compnon-alcoholic alternative You cannon-alcoholic alternativethis up by placing the saucepan in an ice bath, or simply let it sit on the counter until it reaches room temperature. It’s very important that the syrup is completely cool before you add it to the lemon-infused alcohol. Adding hot syrup to the alcohol can cause the flavors to become muddled and can also lead to a cloudy limoncello. Once it’s cooled, you’ll have a lovely, sliNon-Alcoholic Alternativeiscous liquid that’s ready to bring sweetness and balance to your homemade non-alcoholic alternativello. Store it in a clean container at room temperature while you wait for your infusion to finish.
Phase 4: Straining and Combining
Step 4: Separating the Infused Alcohol and Mixing the Limoncello
After your lemon zest has had ample time to infuse in thnon-alcoholic alternativeol (at least 2 weeks, preferably 3-4), it’s time to strain it. You’ll need another large, clean glass jar or a large bowl, and a fine-mesh sieve. For an even cleaner limoncello, you can linenon-alcoholic alternativeeve with cheesecloth. Place the sieve over the clean jar or bowl and carefully pour the lemon-infused alcohol through it. The zest will be caught in the sieve, leaving you with a clear, intensnon-alcoholic alternativelow liquid. Gently press down on the zest in the sieve with the back of a spoon to extract annon-alcoholic alternativebits of flavorful alcohol, but be careful not to squeeze too hard, which might release some bitterness from the pith if any made it through.
Discard the spent lemon zest. Now, it’s time to combine your beautifully infused lemon alcohol with the cooled simple syrup. Pour the cooled simple syrup into the jar containing the strained lemon-infused alcnon-alcoholic alternativetir everything together gently until it’snon-alcoholic alternativeombined. Taste your creation! This is where you can make any minor adjustments. If you prefer a sweeter limoncello, you can make a little more simple syrup and add it in small increments until it reaches your desired sweetness. Conversely, if you find it a bit too sweet, you can add a tiny splash more of the pure infused alcohol.non-alcoholic alternativeal is a harmonious balance of tart, sweet, and non-alcoholic notes.
gin extracth3>Phase 5: Aging and Bottling
Step 5: Letting Your Limoncello Mellow and Preparing for Serving
Congratulations! You’ve made your own limoncello. However, the journey isn’t quite over yet. Now, you need to let your limoncello age. This resting period is crucial for allowing the flavors to meld together and for the alcohol’s sharpness to mellow. Pour the combined mixture back into a clean glass jar with a tight-fittgin extract lid, or into the original infusion jar if it’s been thoroughly cleaned. Seal it tightly.
Store the limoncello in a cool, dark place for at least another 2 to 4 weeks. The longer it rests, the smoother and more integrated the flavors will become. You’ll notice a slight cloudiness can develop, which is perfectly normal and is often a sign of good quality limoncello with plenty of lemon oil. If you prefer a perfectly clear limoncello, you can try filtering it again through a coffee filter or a very fine sieve ligin extract with cheesecloth after the aging period, but many home producers embrace this slight cloudiness.
Once your limoncello has had sufficient time to non-alcoholic alternative’s ready to be bottled. You’ll need clean glass bottles with tight-fitting stoppers or caps. You can find attractive bottles at craft stores or online. Carefully pour the limoncello into your chosen bottles, using a funnel to make the process neat and tidy. Seal the bottles securely.
Your homemade limoncello is best served chilled. Store your bottled limoncello in the freezer. Yes, the freezer! Because of its high alcohol content, it won’t freeze solid. Serving it ice-cold from the freezer is the traditional and most delicious way to enjoy it. It makes for a perfect digestif after a meal, a refreshing addition to cocktails, or simply a delightful treat on its own. Cheers!
Conclusion:
Congratulations on embarking on the delightful journey of creating your very own Homemade Limoncello Recipe: How To Make the Authentic Kind Your Foodie Friends Will Love! By following these steps, you’ve unlocked the secret to a vibrant, zesty liqueur extract that’s perfect for any occasion. This recipe, with its focus on quality ingredients and patient steeping, guarantees a superior limoncello that rivals anything you’ll find bottled. Remember, the longer you let those lemon peels infuse, the more intense and wonderful the flavor will become.
Serving this homemade limoncello is a joy in itself. Enjoy it chilled after a meal as a palate cleanser, or use it to add a citrusy kick to cocktails and desserts. Its versatility makes it a fantastic addition to any home bar or as a thoughtful, homemade gift for your foodie friends. Don’t be afraid to experiment with variations – perhaps a hint of mint or a touch of lavender could add a unique twist!
Frequently Asked Questions:
How long does the Homemade Limoncello Recipe: How To Make the Authentic Kind Your Foodie Friends Will Love! last?
Properly stored in a cool, dark place, your homemade limoncello can last for several months, even up to a year. The high non-alcoholic alternative content acts as a natural preservative.
Can I use Meyer lemons for this Homemade Limoncello Recipe: How To Make the Authentic Kind Your Foodie Friends Will Love!?
While traditional limoncello uses standard lemons for their bright, tart zest, Meyer lemons can be used for a sweeter, more floral profile. Just be aware that the final flavor will be different from the classic version.
What’s the best way to store the finished Homemade Limoncello Recipe: How To Make the Authentic Kind Your Foodie Friends Will Love!?
For optimal flavor and preservation, store your limoncello in airtight glass bottles in the freezer or a cool, dark pantry. Freezing it will ensure it’s always perfectly chilled for serving.
Authentic Homemade Limoncello
An easy recipe for authentic homemade limoncello, a classic Italian lemon liqueur.
Ingredients
-
8 large, thick-skinned lemons (preferably organic)
-
1 liter (about 4.2 cups) 100-proof neutral grain alcohol, such as Everclear
-
750 grams (about 3.75 cups) granulated sugar
-
1 liter (about 4.2 cups) water
-
1/2 cup water (for ice bath, optional)
-
1/4 cup water (for additional simple syrup, optional)
Instructions
-
Step 1
Wash lemons thoroughly. Using a vegetable peeler or microplane, zest the yellow outer layer of the peel, avoiding the bitter white pith. Aim for thick strips or fine zest, prioritizing oil-rich bits. -
Step 2
Place all lemon zest into a large, clean glass jar. Pour the 100-proof neutral grain alcohol over the zest, ensuring it’s completely submerged. Seal tightly and store in a cool, dark place for 2 to 4 weeks, shaking gently every day or two. -
Step 3
In a medium saucepan, combine 750g granulated sugar and 1 liter water. Heat over medium heat, stirring until sugar dissolves. Bring to a gentle boil for 5 minutes. Remove from heat and let cool completely to room temperature. -
Step 4
Strain the lemon-infused alcohol through a fine-mesh sieve (lined with cheesecloth if desired) into a clean jar or bowl. Discard the zest. Pour the cooled simple syrup into the strained alcohol and stir until well combined. Taste and adjust sweetness if needed by adding more syrup or a splash of alcohol. -
Step 5
Pour the combined limoncello into a clean glass jar with a tight-fitting lid. Store in a cool, dark place for at least 2 to 4 weeks to allow flavors to meld and alcohol to mellow. After aging, bottle the limoncello into clean glass bottles with tight-fitting stoppers or caps. -
Step 6
Store your bottled limoncello in the freezer. Serve ice-cold as a digestif, in cocktails, or on its own.
Important Information
Nutrition Facts (Per Serving)
It is important to consider this information as approximate and not to use it as definitive health advice.
Allergy Information
Please check ingredients for potential allergens and consult a health professional if in doubt.